This is my go-to Bread machine sourdough bread recipe. Ever since I bought my bread machine, I was thrilled that I could prepare delicious bread with minimal effort every day. But I was missing that tangy flavour of the sourdough bread made by an artisan bakery.
So I set myself a target to figure out a way to combine the two. The ease of use of the bread machine and the delicious flavour of a genuine sourdough bread. In this recipe I will walk you through step by step, how to prepare your sourdough starter, how to care for it, my tips and tricks for making the perfect bread machine sourdough, how to setup your bread machine and of course the recipe! This is truly the ultimate guide for a bread machine sourdough! So lets get started…
Why is making sourdough bread so time consuming?
Making sourdough bread is certainly time consuming. When I was researching the internet for my bread machine sourdough recipe, I quickly discovered that in order to get that artisan look and flavour you need time.
Time to wait for the dough to bulk ferment. Anything from 4 hours to upwards of 18 if your are doing a cold ferment. Time to attend to the dough and do 4-5 stretch and folds every 20-30 minutes to develop the dough’s gluten. Time to prepare your dutch oven, preheat your oven, shape and bake your dough.
That amount of time is what put me off from making my own sourdough bread. So I set off to develop a recipe that I can make daily using my bread maker and that tastes and feels as close as possible to that delicious artisan bread that I love.
This sourdough bread machine recipe has no yeast, unlike many that I have found online, so you will get that delicious true sourdough taste and texture!
Preparing your sourdough starter
You have two options to prepare and make your starter for your sourdough bread machine bread. Firstly, try to cultivate your own or, take a short cut and buy a portion of an already mature starter.
Making your own sourdough starter is not difficult, it just needs time. You need about one to two weeks of time and a little bit of luck. There are plenty of guides on the internet that will take you step by step through the process of preparing your own starter – check them out here and here.
For my sourdough adventures, I chose to buy a portion of an already mature starter. Admittedly I was a bit hesitant to experiment with making my own and I felt much more comfortable buying an already good, strong culture from a professional bakery. I found this one on amazon and I was amazed by how well it works.
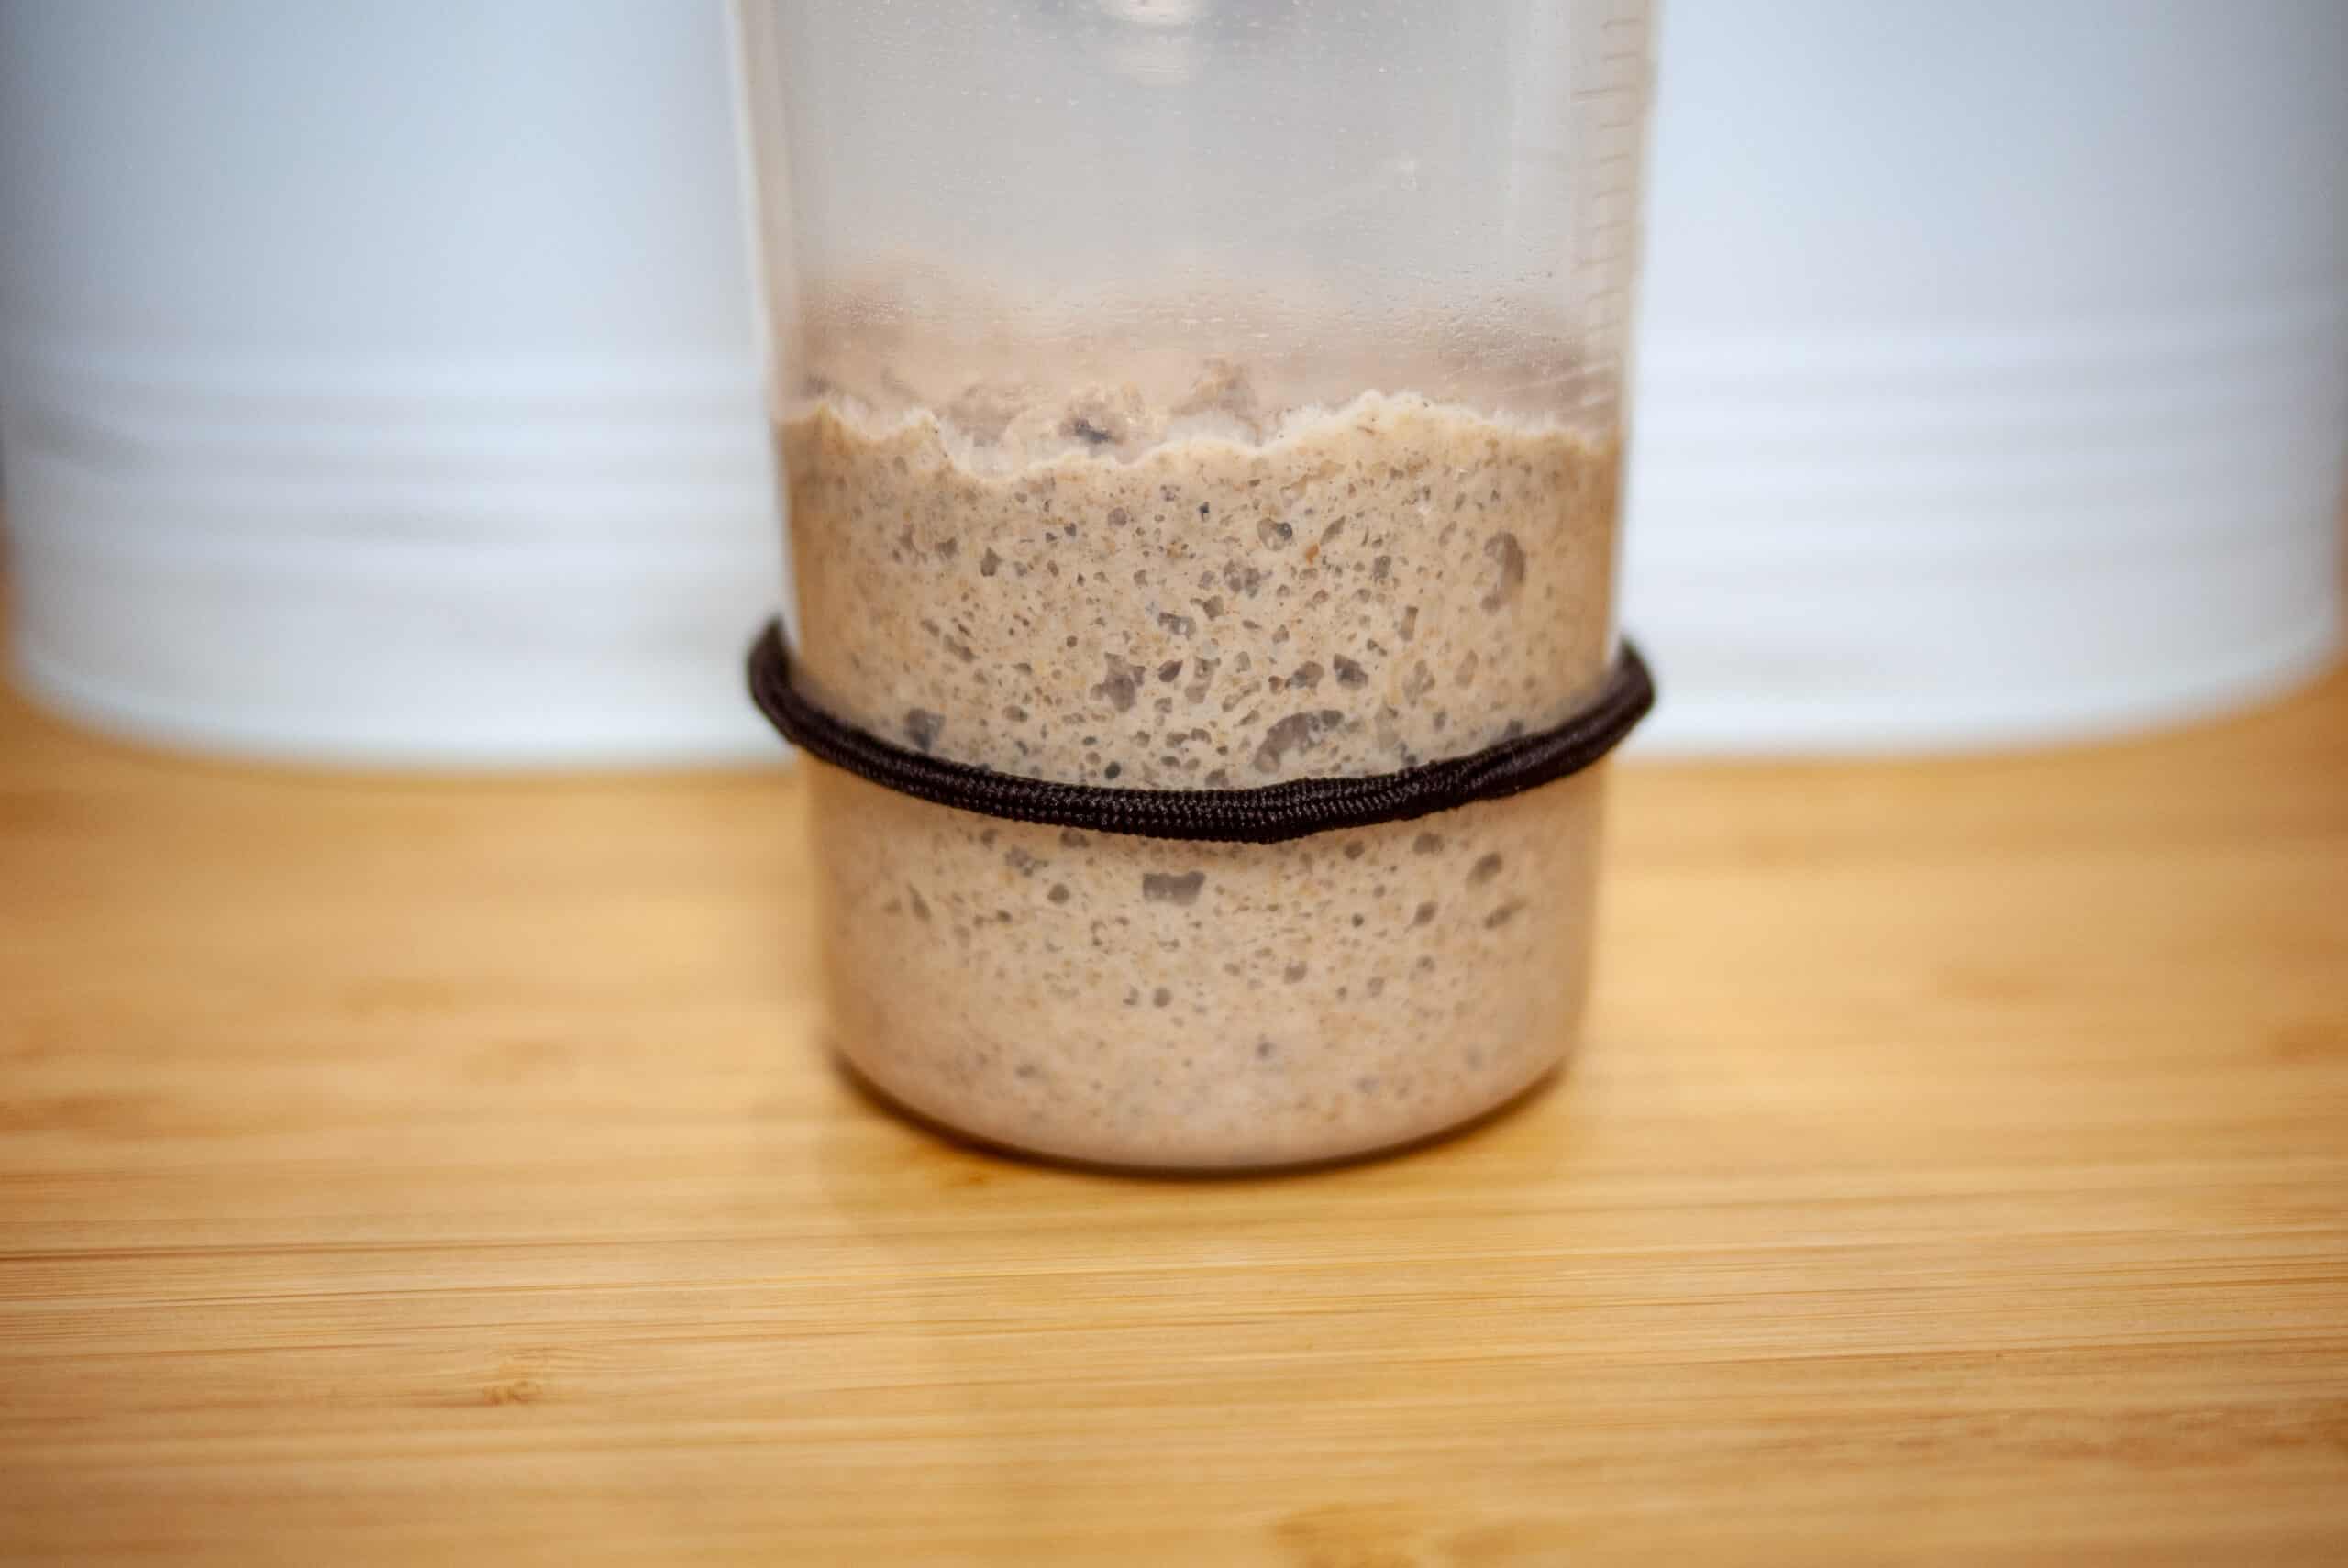
It doubles in size reliably every 6 hours, smells just like the sourdough bread I buy from my local bakery and it is super low maintenance and very resilient. Perfect for a sourdough beginner!
Caring for your sourdough starter
An established sourdough is very easy to maintain. Depending on how often you bake you can opt for one of two approaches.
If you bake daily or every other day, keep your sourdough out of the fridge. Depending on how strong your sourdough starter is it may need “feeding” once or twice a day (every 12 hours). How can you tell? When the sourdough starter has doubled in size, has stopped growing and its top has flattened and is starting to recede, its time to feed it.
If you bake weekly it makes more sense to keep your sourdough starter in the fridge. Take it out the day before, feed it in the morning and in the evening then use it the next morning to make your bread. Feed it again and put it back in the fridge.
How much to feed your sourdough starter
How much should you feed your starter? The simplest approach is to use equal weights of starter, flour and water.
The night before you bake, keep 40 grams (1.4oz) of starter and then mix in a fresh 40 grams (1.4oz) of wholegrain rye flour and 40 grams (1.4oz) of water. In the morning you’ll have 120 grams (4.2oz) of starter ready to go! Measure out 80 grams (2.8oz) for the bread, 20 grams (0.7oz) to feed and discard the rest. Finally feed the 20 grams (0.7oz) of retained starter with 20 grams (0.7oz) of flour and 20 grams (0.7oz) of water.
If you’re not planning to bake the next day, just maintain 60 grams (2.1oz) of starter throughout the feedings. In both morning and evening feeds keep 20 grams (0.7oz) of starter and feed it with 20 grams (0.7oz) of flour and 20 grams (0.7oz) of water.
The above technique will minimise your flour waste while keeping your sourdough starter healthy and happy and ready to go for when you need it!
What is the best flour to feed my sourdough starter?
Without a doubt, wholegrain dark Rye flour. It contains plenty of nutrients for your yeast and bacteria to thrive and it gives your sourdough bread in bread machine starter a delicious tangy taste! Its nutrient rich nature also makes your starter very active which is exactly what you want for a soft and airy bread!
Sourdough bread in bread machine tips and tricks
After plenty of experimentation I’ve put together the following list of tips and tricks for you to make the perfect bread machine no yeast sourdough bread!
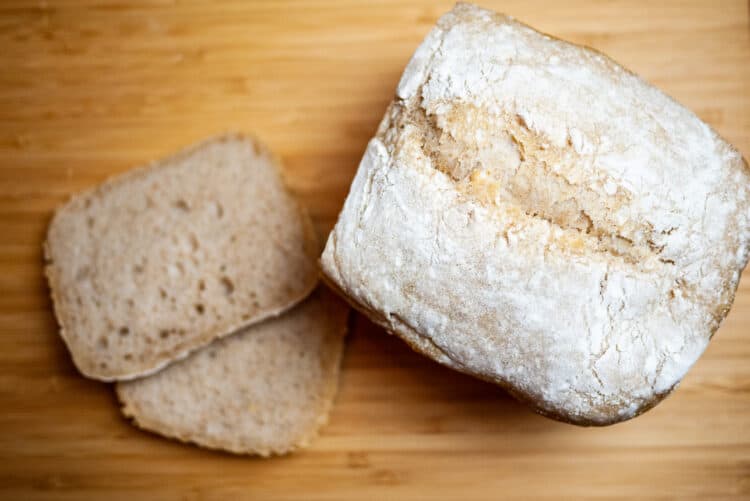
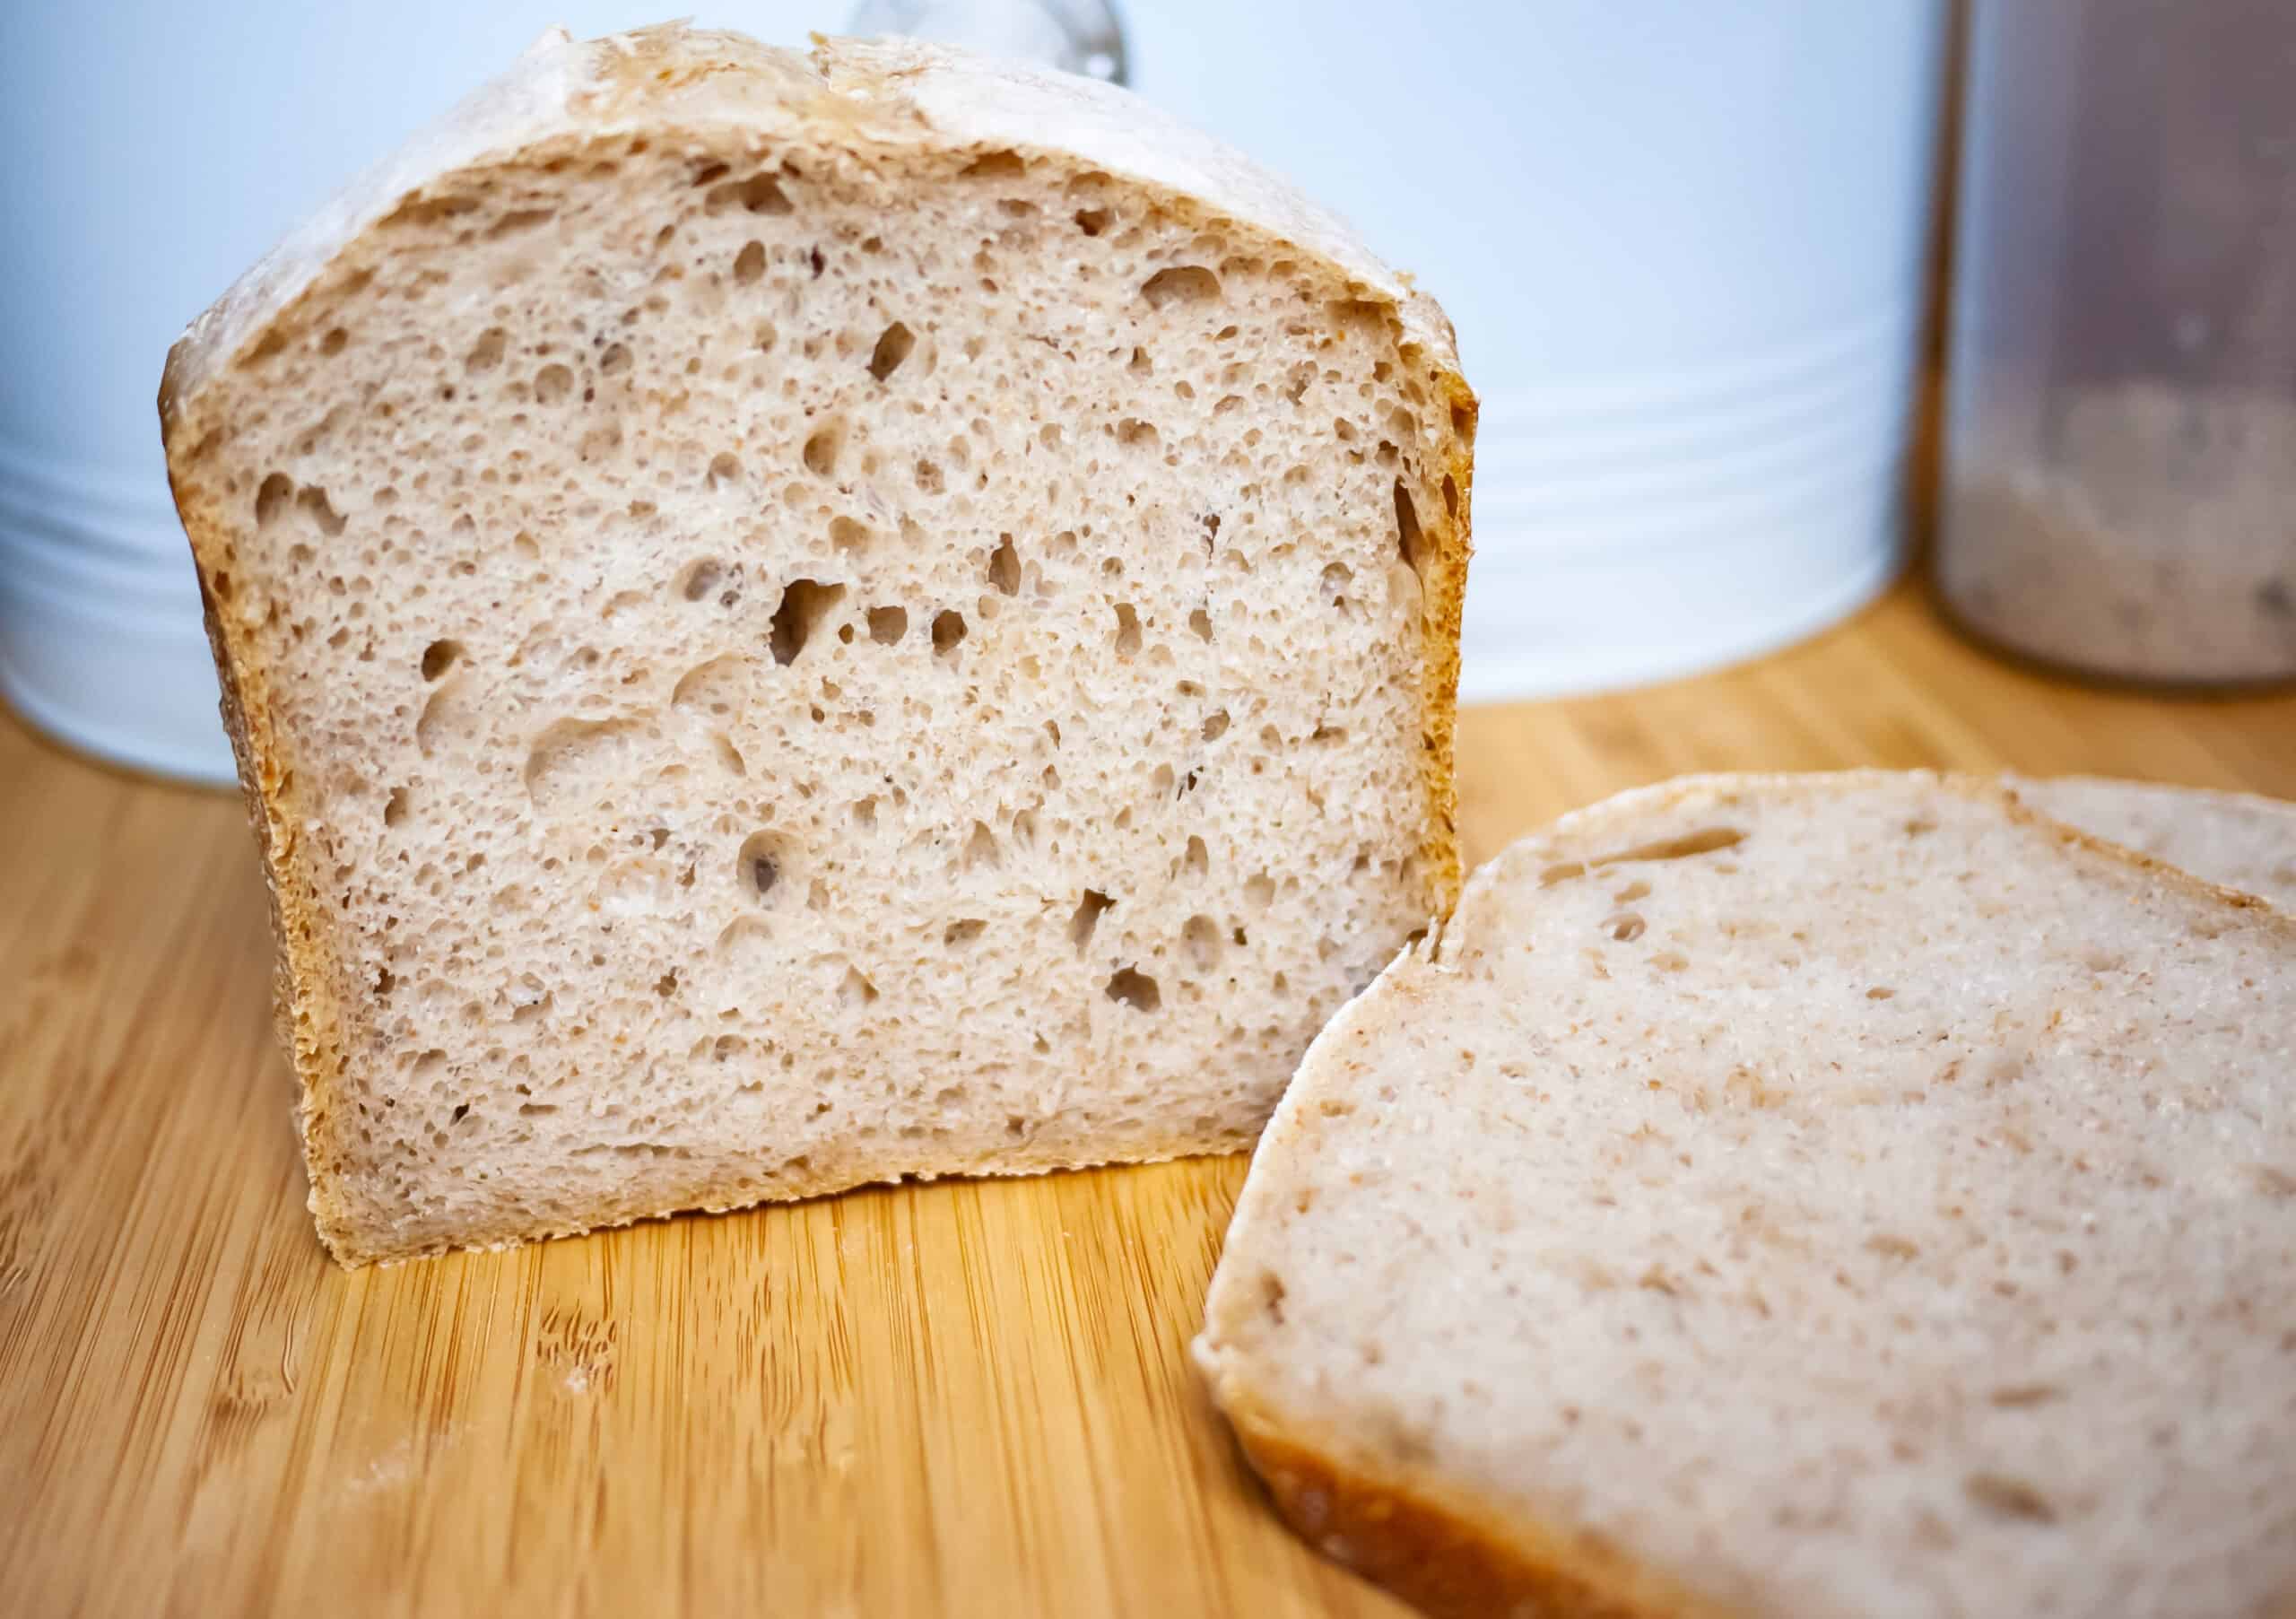
The amount of water you use will determine how soft and fluffy your bread machine sourdough becomes. As a general rule of thumb, the higher the hydration, the more airy and fluffy the crust. If you like your bread airy, use the 75% hydration recipe below. If you prefer your bread a little bit more solid use the 65% hydration recipe below. In addition, the higher the amount of water the crunchier your crust will become.
A little bit of fat in your bread will help extend its shelf life and keep the crumb softer for longer. On the downside, you won’t get as crackly a crust compared to a lean, no fat dough. I have found that ~2% of fat compared to the total flour weight gives a great balance between dough longevity, crumb softness while retaining a firm, crunchy crust that I like.
A dash of sugar or a sprinkle of honey results in a nicely browned crust. This is particularly important as most bread makers do not reach as high a temperature as your home oven resulting in bread that is not as brown as you may expect. You don’t need much, half a teaspoon is enough to give your dough a nice colour boost!
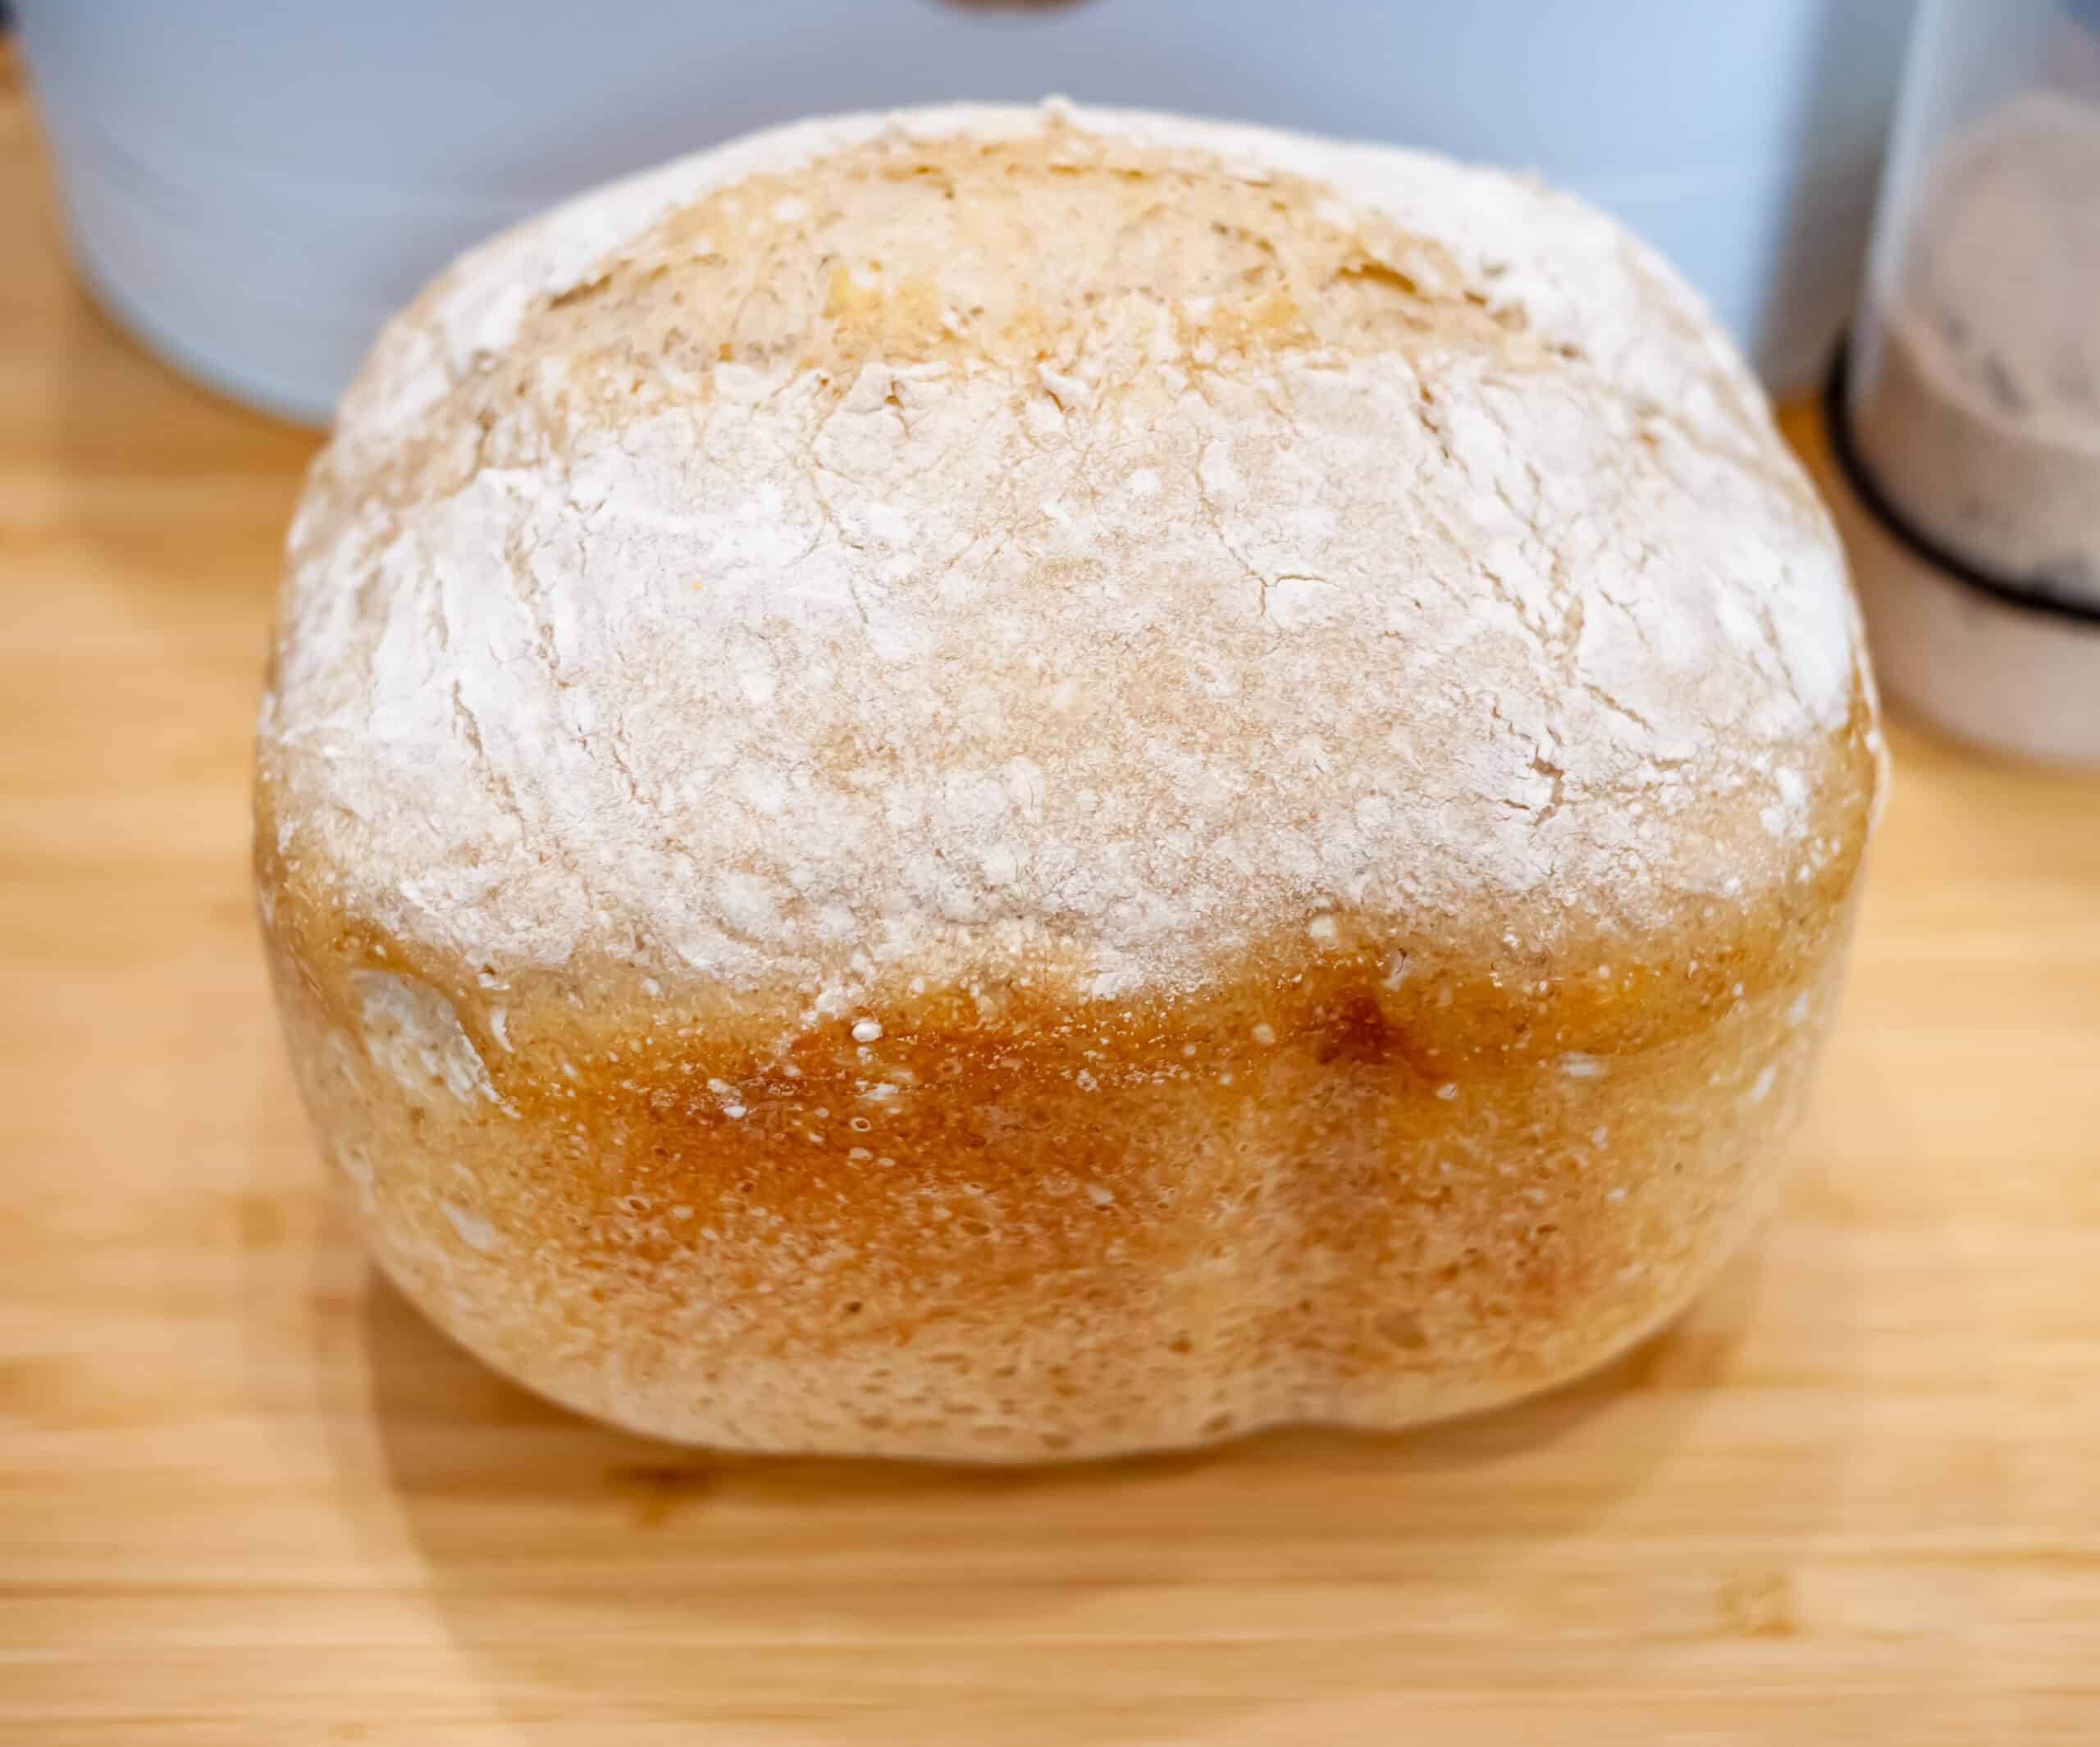
Before starting the bake programme, sprinkle a bit of flour on top and score it lengthwise in the middle. This gives your bread that delicious flour covered rustic look. But also more importantly, it gives space for your dough to rise evenly, preventing a lopsided bread!
Setting up your bread machine to make no yeast sourdough bread
What I love about making sourdough bread in bread machine is that it takes very little effort from my side and yet still results in a bread that takes amazing! In this section I will guide you through the process of setting up your bread machine and what programmes to use to achieve the perfect sourdough bread!
You will need to use three programmes in your bread machine for this recipe. The Mix, Rise and Bake programmes. As I own a Panasonic SD-ZX2522 and used to own a Panasonic SD-ZB2512KXE I’ll give you the programme numbers for them, but a quick check on your machine’s manual will help you find the right programme for yours!
The first step with my sourdough bread machine recipe is to mix the ingredients. In your bread machine bowl add your mixing paddle and measure out the starter. Then add the flour, the salt, sugar/honey, butter and finally the water. Pour in the water towards the edges of your bowl to make your paddle’s work a bit easier! After that, select the dough only setting and let it mix for about 20 minutes, or a bit longer, until all the ingredients are fully combined and the dough is starting to come off the walls of your machine. For the Panasonic SD-ZX2522, use menu 29 which does 2 short kneading cycles with a short rest interval in the middle followed by a rest period. For the Panasonic SD-ZB2512, use menu 26.
The second step is to let your bread machine sourdough bread rest until it has increased by 50% in size. If your bread machine has a proofing setting use it as it will keep the dough temperature at the ideal point for proofing. For the Panasonic SD-ZX2522 use menu 30 and stop it when the dough has risen by 50% of its size. For the Panasonic SD-ZB2512, use menu 27. If your bread machine doesn’t have a proofing menu, don’t worry, leave the lid shut and let it rest until the dough has risen. If you want your bread to become a bit more acidic, don’t use the proofing setting and just let it sit in the bread machine.
The third step is to bake your sourdough bread! As most bread machines don’t heat up to the same level as a home oven, you will need to bake your bread for slightly longer. I have found that approximately 1 hour to 1 hour and 15 minutes baking will give you a golden brown crust and good brunch! For the Panasonic SD-ZX2522 and the Panasonic SD-ZB2512 use menu 18 and set the timer for 1 hour and 15 minutes. Remember, don’t open your lid while your bread is baking and especially during the first 45 minutes as you’ll loose a lot of heat and the top of your bread won’t get browned.
That is it! Three simple steps will get you the most trouble free and yet delicious sourdough bread you’ve ever made!
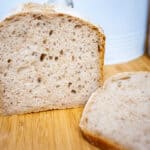
This is my go-to Bread machine sourdough bread recipe. This is a true sourdough bread, without yeast that tastes and feels just like an artisan loaf! It combines the ease of use of the bread machine and the delicious flavour of a genuine sourdough bread while taking much less effort and time to prepare!
Just select whether you want a light and fluffy or a bit more substantial bread from my two variations below! The pictures are from the lighter variation (75% hydration).
In your bread machine basket, pour in your sourdough starter then the flour
Add in the sugar/honey, salt and the butter
Pour in your water around the edges of the baking basket
Set your bread machine to the kneading cycle for 30 minutes or if it has a sourdough dough cycle use that. For the Panasonic SD-ZX2522 use menu 29. For the Panasonic SD-ZB2512 use menu 26.
Once your sourdough bread has finished kneading, let your dough rest and proof for 3-4 hours or until it has risen by about 50% of its original size. For the Panasonic SD-ZX2522, use menu 30 for about 2 hours and 30 minutes to accelerate the proofing or let it rest with the machine switched off for about 4 hours for a more sour flavour. For the Panasonic SD-ZB2512KXE use menu 27 for the same amount of time (2h 30mins). Note that proofing time will depend on how active your sourdough starter is so adjust accordingly until your bread has risen the right amount.
Once proofed, sprinkle some flour on top and score lengthwise with a sharp knife or a blade. Pop any large bubbles that may have appeared on the surface.
Set your bread machine to the bake programme and set its timer for 1 hour and 15 minutes. For the Panasonic SD-ZX2522 and the Panasonic SD-ZB2512, use menu 18.
Once done, remove the basket and tip the bread over to an airing rack. Let it cool down for about an hour before cutting it.
If you want to prepare your bread overnight and own a Panasonic bread machine use menu 10 for the Panasonic SD-ZB2512 and menu 11 for the Panasonic SD-ZX2522. The loaf will be slightly denser so I recommend going with the 75% Hydration – Lighter dough recipe above.
Brilliant, I’ve been make a sourdough loaf since the start of COVID lockdown. At last I have a lovely sourdough loaf.
I hadn’t realised menus could be used as a proving facility and this has opened up a lot more possibilities. Many thanks for your clear instructions your persistence in finding the best way forwards.
Your welcome Lin! Same here, I experimented with sourdough during lockdown and have loved it ever since! Indeed you can, it makes a great proofing box and really cuts down the amount of time you need to proof your dough :)!
Hi Eli. Thanks so much for this recipe – I use it at least a couple of times a week! I’m wondering if you’ve played around with a bread machine sourdough wholemeal or rye recipe? I’d love to find a recipe which works for this!
Does the breadmaker do all the kneading that is required?
Can I put shaped dough straight into oven .
It looks fantastic to me, you must of done lots of behind the scenes work. And can you mix flours when feeding starter??
Many thanks for sharing.
I’m a home bread baker making yeast and sourdough breads, by hand and bread machine. This recipe, the machine mixes, then you bulk ferment for 3-4 hours. Then score and bake. Aren’t we missing a proofing step after bulk, to shape then score and bake?
You don’t need to shape if you’re baking a loaf in the bread machine. If you want to bake it in a dutch oven, then yes you’re right, when the bulk fermentation finishes, take it out, shape it, place in a banneton and let it rest in the fridge overnight. Then score and bake 🙂
Thank you for the receipe, I had success on first attempt with half wholemeal flour and half white. I wonder if it will rise even better if I leave the bulk ferment for longer like 12 hours as most of the bulk ferment take?
I had tried that before and my bread turned flat – maybe my starter was too active, but a longer ferment may result in it over proofing and then flattening when baking 🙂
This is the first sourdough recipe I’ve found that says you can bake it in the bread machine instead of in the conventional oven. I have a Cuisinart compact maker BC220PCC. Has anyone tried baking right in the bread machine?
I’ve made the same recipe in both the bread machine and a dutch oven. Both will work but they will give you a different type of bread – in the bread machine you’ll get a loaf that is more like a pan loaf, compared to the dutch oven that will give you a more crispy crust, due to the higher heat. Take a look at my alternative sourdough prepared in the bread machine but baked in the oven here: https://www.mygreekdish.com/recipe/easy-sourdough-bread-recipe-with-starter-prozimi/
In my limited experience with a bread machine, all of the recipes I’ve seen suggest that all liquids must be placed in the bucket first and then, dry ingredients (for example, flour).
Sorry I am afraid I dont 🙁 But the programmes should be similar! You’re looking for a dough settings proofing setting (or proof for longer with the machine off) and a bake setting.
Over the past 5 years we have developed our own starter …and using our starter…we bake great sourdough bread in our bread machine…no yeast added. All natural.
BUT here’s the thing…
my wife lets the bread rise for 5 hrs or more (until she can see that it has reached all the way to the top of the pan) then she turns on the bread machine’s heat and bakes it for approx 1 hour.
Do I understand you correctly? You do not do it that way?
You simply let the dough rise to about twice its original size (not all the way to the top of the bread machine’s pan like my wife does) and after it doubles in size (but not to the top of the pan) you then you just go ahead and turn on the bread machine’s heat and start baking it for that one hour???
Yes with a very active starter I’ve tried both ways – waiting until it has proofed for 4-5 hours and for a total of 2 hours and I’ve noticed that if I let it go all the way to the top the bread turns out to be over proofed. So my personal recommendation is to let it rise to twice its size and then start the bake cycle.
Hi- I’m making sourdough for the very first time. I thought my starter was ready, but now after 3 hours in the bread machine, it is soupy and not rising. Should I add yeast, or flour, or throw the whole batch out?
Any suggestions would be greatly appreciated!
Amanda
This is so great. However, I have a Panasonic SD-ZB2502, which doesn’t have Sourdough settings. How do I use a different setting to set a 30 minute kneading cycle, and a proofing cycle?
You can use any mode to do the kneading. Then simply stop the cycle and let it rest in the machine to proof till double in size. Then run the baking cycle on its own.
I have a Panasonic bread machine ZX2522 and it is in the cold pantry, specially now it is cold, was wondering if I could mix all ingredients at night and put the cycle 29 on and leave it over night 8hrs , to do its own thing and bake in the morning? Would it be that different to putting it in the fridge? Just for continence. I be grateful for your advice.
It should be OK but I would personally advise to use a bit less starter depending on how cold your pantry is. If its 5-7 degrees Celsius then use all of the starter in the recipe. If its around 15C I’d use about 20 grams less.
I have been making sourdough bread in my bread machine for a while. I always made it as a two-step process first letting the sourdough ferment with half of the flour, then adding the rest of the flour, with a second kneading session. Thanks your way is simpler and faster.. today I’m doing kamut sourdough in the bread machine.
Have you used this recipe with non wheat flours like white spelt? Would you use programme 34 rather than 29 if you had the ZX2522 for mixing the ingredients in that case? Thanks.
My dough was very, very wet. I used weight measurements and all were correct with a few grams extra here and there. I had to add about 1 cup more flour and knead more. Is that ok? Why do you think that happened?
I am learning that it is ok to add flour or water to get it just right! People want bread machines to be dump and go but my understanding is it is so important to check to make sure dough is the right consistency before walking away. I have had to add about 1-2 tbsp extra when I make it.
Absolutely! Every flour is a bit different – it can absorb a little less or a little more moisture depending on many factors (variety, storage conditions etc). So while a recipe will work well most of the time, if you’re looking for perfection a little eye on the dough before letting it bake is needed 🙂 In Greece, we call it me to mati (translated to: by eye)
You can use rye but on its own it will be very dense. Try using a 80-20 white bread and rye mix. It’s more forgiving while still retaining the flavour of the rye. Also keep an eye on your proofing times as it may take a little less – the rye is a great food for the sourdough!
No. I have a 2lb Zojurushi which recommends 553g flour and 330g water for the base of most recipes. 460g flour plus 80g starter with 335g water is approaching those amounts.
I have mad this recipe with the lighter loaf version twice and the flavor comes out delicious. It rose beautifully and did not seem overproofed. However both times it sunk in the middle about 3 inches during the bake. Could it be because I’m using Einkorn wheat flour and do you have any recipe adjustment ideas so that it doesn’t fall? Thank you!
Indeed sinking in the middle means over proofing. Maybe try kneading it a bit more to develop the gluten a bit further (run the knead cycle again) and use a little less starter / let it proof a little less.
Absolutely – however skip the proofing in the bread machine and let it proof in the fridge overnight only. It may need a little longer to bake though as the dough will be cold.
Hi Andreas thanks so much for the detailed instructions, my loaf worked the first time and I’m delighted! I was given some sour dough starter by a friend where I live on Christmas Island and it has a long history here, its a fabulous past time, I will continue with trying other flours and even try some in an oven (I don’t currently have one)
Perhaps this would work in a camp oven too?
I have an old Panasonic SD-253 and used the Pizza dough 45 minute setting to make the dough. Then I left the dough in the machine overnight (12 hours) and then baked. The bread turned out exactly as you have described; thank you. I’m now going to experiment with a wholemeal/white flour mix to see if I can get the same results. Also I want to try using a kefir/milk mix instead of water to see if it gives a stronger sourdough taste.
I had great success with your recipe! I have a Zojirushy bread maker 2lb and added the ingredients as listed > started the dough cycle and then left my dough to rise/bulk ferment for about 6ish hours before baking for suggested time! It is a lovely, soft loaf with great flavour! Just what I have been looking for to simplify my process!
Did you program a “homemade” bread setting on this machine? If so could you please share your instructions on how to do so and what to set it at for this machine? I am getting this bread machine in the plus version. I am a very new sourdough gal so I need all the help I can get. Busy working mom business owner so trying to keep things as simple as possible and healthy along the way for my family!
Did you program a “homemade” bread setting on this machine? If so could you please share your instructions on how to do so and what to set it at for this machine? I am getting this bread machine in the plus version. I am a very new sourdough gal so I need all the help I can get. Busy working mom business owner so trying to keep things as simple as possible and healthy along the way for my family!
I LOVE this recipe, I now call it mine…even though it’s yours! Have you ever baked this in the oven? I often put my ingredients in at night, set dough setting and ten leave until the morning [7-9 hours], then bake. I’d love to try baking it in the oven so I don’t get the paddle holes but wondering if I should bake as high as an artisan loaf [450-500] or lower? I feel it should be higher than bread machine temperature because I can. [maybe?]
We’d recently purchased a Panasonic bread maker (SD-YR2550) and despite following the instructions printed in the booklet had failed to make a decent sourdough loaf. You have revolutionised our lazy bread making. Successful loaf first time following your instructions and using the sourdough bread setting on the machine. We cannot thank you enough! Tasty sourdough every time and easy to follow recipe. Thank you Eli!
Hi Sonia. I recently also got the YR2550, and was wondering how you followed this process using that machine? I too haven’t had success using the the 5 hour Sourdough selection.
Thanks so much!
Thank you for all your tips. I would like a stronger sourdough flavour to my bread. Should I use less starter and prove at room temperature overnight before baking please?
Hi. This looks brilliant and I’m hoping to try this afternoon. Please however clarify – are we looking for 50% growth or 100% (double) growth during proofing? Also my machine has a max bake temp of 150C – how long would you recommend baking for 1X recipe and how long for a 2X recipe? Would using a thermometer to test internal temperature help? What temp would you expect to see when it is right? Thanks very much and am hoping I’m not too late in asking:)
First time bread baker here! I’m confused about how the sourdough starter works. Do you make the sourdough starter first letting it rise then add it to the bread machine or add all of the ingredients to the machine at once?
This process also worked with 100 percent whole wheat. I got some starter from my son and did 2 cycles of feedings with fresh ground hard red wheat berries. Put it in my Panasonic YD sd250 machine on the dough cycle. Left it in the machine overnight to continue proofing. Baked in machine 1 hour 15 minutes. The only caution is to be very careful if you score it or maybe not at all. The gluten is not as strong as with white flour and it wants to collapse. But the result is worth it. Great sour flavor and a more European-like hearty texture.
Over the past 8 years you have made My Greek Dish the number one destination for anyone searching for authentic Greek recipes! For that I cannot thank you enough!
It all started with an idea… To collate and publish all those recipes that I loved when I was young, the ones I made with so much love for my children and grand children!
So go ahead, explore my delicious collections and don’t forget to leave me a comment, connect with me on Facebook or Instagram and sign up to my mailing list so you never miss out on my latest creations!

")
")

")
")
")

")

Brilliant, I’ve been make a sourdough loaf since the start of COVID lockdown. At last I have a lovely sourdough loaf.
I hadn’t realised menus could be used as a proving facility and this has opened up a lot more possibilities. Many thanks for your clear instructions your persistence in finding the best way forwards.
Your welcome Lin! Same here, I experimented with sourdough during lockdown and have loved it ever since! Indeed you can, it makes a great proofing box and really cuts down the amount of time you need to proof your dough :)!
Hi Eli. Thanks so much for this recipe – I use it at least a couple of times a week! I’m wondering if you’ve played around with a bread machine sourdough wholemeal or rye recipe? I’d love to find a recipe which works for this!
Does the breadmaker do all the kneading that is required?
Can I put shaped dough straight into oven .
It looks fantastic to me, you must of done lots of behind the scenes work. And can you mix flours when feeding starter??
Many thanks for sharing.
Yes indeed, the bread maker does all the kneading. If you want to bake it in the oven instead of the bread maker you’ll need to shape it, place it in a banneton and do the final proof plus bake. I’ve got a recipe for that too here: https://www.mygreekdish.com/recipe/easy-sourdough-bread-recipe-with-starter-prozimi/
Hi can I know what is the baking temperature of ur breadmachine? Thanks
I think it bakes at 180C/350F, but not 100% sure as it doesn’t let me select a temperature 🙂
I’m a home bread baker making yeast and sourdough breads, by hand and bread machine. This recipe, the machine mixes, then you bulk ferment for 3-4 hours. Then score and bake. Aren’t we missing a proofing step after bulk, to shape then score and bake?
Hi Robert
You don’t need to shape if you’re baking a loaf in the bread machine. If you want to bake it in a dutch oven, then yes you’re right, when the bulk fermentation finishes, take it out, shape it, place in a banneton and let it rest in the fridge overnight. Then score and bake 🙂
Thank you for the receipe, I had success on first attempt with half wholemeal flour and half white. I wonder if it will rise even better if I leave the bulk ferment for longer like 12 hours as most of the bulk ferment take?
I had tried that before and my bread turned flat – maybe my starter was too active, but a longer ferment may result in it over proofing and then flattening when baking 🙂
Great recipe, what would you suggest for light wheat sourdough in bread maker?
This is the first sourdough recipe I’ve found that says you can bake it in the bread machine instead of in the conventional oven. I have a Cuisinart compact maker BC220PCC. Has anyone tried baking right in the bread machine?
I’ve made the same recipe in both the bread machine and a dutch oven. Both will work but they will give you a different type of bread – in the bread machine you’ll get a loaf that is more like a pan loaf, compared to the dutch oven that will give you a more crispy crust, due to the higher heat. Take a look at my alternative sourdough prepared in the bread machine but baked in the oven here: https://www.mygreekdish.com/recipe/easy-sourdough-bread-recipe-with-starter-prozimi/
In my limited experience with a bread machine, all of the recipes I’ve seen suggest that all liquids must be placed in the bucket first and then, dry ingredients (for example, flour).
Has anyone tried this in a russell hobbs breadmaker,if so how did it turn out and what did you do.
Do you have the settings for a zojirushi bb-pac20
Sorry I am afraid I dont 🙁 But the programmes should be similar! You’re looking for a dough settings proofing setting (or proof for longer with the machine off) and a bake setting.
Over the past 5 years we have developed our own starter …and using our starter…we bake great sourdough bread in our bread machine…no yeast added. All natural.
BUT here’s the thing…
my wife lets the bread rise for 5 hrs or more (until she can see that it has reached all the way to the top of the pan) then she turns on the bread machine’s heat and bakes it for approx 1 hour.
Do I understand you correctly? You do not do it that way?
You simply let the dough rise to about twice its original size (not all the way to the top of the bread machine’s pan like my wife does) and after it doubles in size (but not to the top of the pan) you then you just go ahead and turn on the bread machine’s heat and start baking it for that one hour???
Is that right?
Thanks,
Richard
Hi Richard,
Yes with a very active starter I’ve tried both ways – waiting until it has proofed for 4-5 hours and for a total of 2 hours and I’ve noticed that if I let it go all the way to the top the bread turns out to be over proofed. So my personal recommendation is to let it rise to twice its size and then start the bake cycle.
Hi, just wondering, the recipe says to let it rise to 50% it’s original size not 100%. Which do you recommend then? Thanks.
Hi- I’m making sourdough for the very first time. I thought my starter was ready, but now after 3 hours in the bread machine, it is soupy and not rising. Should I add yeast, or flour, or throw the whole batch out?
Any suggestions would be greatly appreciated!
Amanda
If its not rising, your starter is probably a bit on the weak side. Does it double in size every 6 hours after a “feeding”?
This is so great. However, I have a Panasonic SD-ZB2502, which doesn’t have Sourdough settings. How do I use a different setting to set a 30 minute kneading cycle, and a proofing cycle?
You can use any mode to do the kneading. Then simply stop the cycle and let it rest in the machine to proof till double in size. Then run the baking cycle on its own.
Dear Eli,
Recipe turned out well, thanks! Have you experimented with a partial whole wheat version by any chance?
I have a Panasonic bread machine ZX2522 and it is in the cold pantry, specially now it is cold, was wondering if I could mix all ingredients at night and put the cycle 29 on and leave it over night 8hrs , to do its own thing and bake in the morning? Would it be that different to putting it in the fridge? Just for continence. I be grateful for your advice.
It should be OK but I would personally advise to use a bit less starter depending on how cold your pantry is. If its 5-7 degrees Celsius then use all of the starter in the recipe. If its around 15C I’d use about 20 grams less.
I have a new to me sd zx2522.
I put the bread mixture in on the sourdough bake programme 30?
Anyway it mixed and baked perfectly
Tried this today. Very pleased with the result. Thank You
Did anyone try replacing some white flour with rye to produce a rye bread loaf?
Can i do this process, but shape it and bake it in oven after scoring? If yes, is a bread tin needed or will it hold its shape? And 1hr-1h15 on 180?
Really want to try sour dough in my Panasonic but my model No is SD-ZB2502 any ideas as to how I do it ?
Can i do this with rye flour and starter only?
Use menu 22, put the completed dough in a bowl, leave overnight and bake in dutch oven at 230c.
I have been making sourdough bread in my bread machine for a while. I always made it as a two-step process first letting the sourdough ferment with half of the flour, then adding the rest of the flour, with a second kneading session. Thanks your way is simpler and faster.. today I’m doing kamut sourdough in the bread machine.
Have you used this recipe with non wheat flours like white spelt? Would you use programme 34 rather than 29 if you had the ZX2522 for mixing the ingredients in that case? Thanks.
Why add a sweetener?
My dough was very, very wet. I used weight measurements and all were correct with a few grams extra here and there. I had to add about 1 cup more flour and knead more. Is that ok? Why do you think that happened?
I am learning that it is ok to add flour or water to get it just right! People want bread machines to be dump and go but my understanding is it is so important to check to make sure dough is the right consistency before walking away. I have had to add about 1-2 tbsp extra when I make it.
Absolutely! Every flour is a bit different – it can absorb a little less or a little more moisture depending on many factors (variety, storage conditions etc). So while a recipe will work well most of the time, if you’re looking for perfection a little eye on the dough before letting it bake is needed 🙂 In Greece, we call it me to mati (translated to: by eye)
Hi Eli,
I want to make rye sourdough, will I get the same result if I use 100% rye flour instead of strong white flour?
Thanks,
Maria.
100% rye sourdough (made by hand and baked in the oven) gives me a very dense but tasty loaf. Maybe try a wheat/rye mix?
You can use rye but on its own it will be very dense. Try using a 80-20 white bread and rye mix. It’s more forgiving while still retaining the flavour of the rye. Also keep an eye on your proofing times as it may take a little less – the rye is a great food for the sourdough!
I have a bread machine that will make a 2 lb loaf. Should I double the recipe?
No. I have a 2lb Zojurushi which recommends 553g flour and 330g water for the base of most recipes. 460g flour plus 80g starter with 335g water is approaching those amounts.
Thank you Donna and Seth! That was exactly the question/answer I was searching for! Now I dont have to wait and hope for a reply! Best wishes!!
Indeed dont double the recipe. However if the loaf turns out to be a bit small try increasing the quantities every so slightly as Seth said below.
I have mad this recipe with the lighter loaf version twice and the flavor comes out delicious. It rose beautifully and did not seem overproofed. However both times it sunk in the middle about 3 inches during the bake. Could it be because I’m using Einkorn wheat flour and do you have any recipe adjustment ideas so that it doesn’t fall? Thank you!
This 3 inches drop during baking suggests it is over-proofed. Try baking earlier.
Indeed sinking in the middle means over proofing. Maybe try kneading it a bit more to develop the gluten a bit further (run the knead cycle again) and use a little less starter / let it proof a little less.
Can you take the loaf out in its pan and put in fridge for a “long ferment” overnight and then just pop it in to bake in the morning?
Absolutely – however skip the proofing in the bread machine and let it proof in the fridge overnight only. It may need a little longer to bake though as the dough will be cold.
Hi Eli
In Athens the neighbour bakery (fournos)
Made wonderful (horiatiko) sourdough
Do you know the recipe ?
Thanks
Absolutely! We have one here: https://www.mygreekdish.com/recipe/easy-sourdough-bread-recipe-with-starter-prozimi/
Hi Andreas thanks so much for the detailed instructions, my loaf worked the first time and I’m delighted! I was given some sour dough starter by a friend where I live on Christmas Island and it has a long history here, its a fabulous past time, I will continue with trying other flours and even try some in an oven (I don’t currently have one)
Perhaps this would work in a camp oven too?
I have an old Panasonic SD-253 and used the Pizza dough 45 minute setting to make the dough. Then I left the dough in the machine overnight (12 hours) and then baked. The bread turned out exactly as you have described; thank you. I’m now going to experiment with a wholemeal/white flour mix to see if I can get the same results. Also I want to try using a kefir/milk mix instead of water to see if it gives a stronger sourdough taste.
I had great success with your recipe! I have a Zojirushy bread maker 2lb and added the ingredients as listed > started the dough cycle and then left my dough to rise/bulk ferment for about 6ish hours before baking for suggested time! It is a lovely, soft loaf with great flavour! Just what I have been looking for to simplify my process!
Fantastic! Sourdough can be tricky but I’ve found this recipe always gets me good results! So glad it worked for you too!
Did you program a “homemade” bread setting on this machine? If so could you please share your instructions on how to do so and what to set it at for this machine? I am getting this bread machine in the plus version. I am a very new sourdough gal so I need all the help I can get. Busy working mom business owner so trying to keep things as simple as possible and healthy along the way for my family!
Did you program a “homemade” bread setting on this machine? If so could you please share your instructions on how to do so and what to set it at for this machine? I am getting this bread machine in the plus version. I am a very new sourdough gal so I need all the help I can get. Busy working mom business owner so trying to keep things as simple as possible and healthy along the way for my family!
I LOVE this recipe, I now call it mine…even though it’s yours! Have you ever baked this in the oven? I often put my ingredients in at night, set dough setting and ten leave until the morning [7-9 hours], then bake. I’d love to try baking it in the oven so I don’t get the paddle holes but wondering if I should bake as high as an artisan loaf [450-500] or lower? I feel it should be higher than bread machine temperature because I can. [maybe?]
How do you convert Grams to Cups?
Can you share the recipe in Cups pleeeeeeeeeeeeease
Buy a kitchen scale. I did and I’m so glad I did!
Mines from IKEA and it works great. Grams/ounces I learned is easier and better for baking. 😃
We’d recently purchased a Panasonic bread maker (SD-YR2550) and despite following the instructions printed in the booklet had failed to make a decent sourdough loaf. You have revolutionised our lazy bread making. Successful loaf first time following your instructions and using the sourdough bread setting on the machine. We cannot thank you enough! Tasty sourdough every time and easy to follow recipe. Thank you Eli!
Hi Sonia. I recently also got the YR2550, and was wondering how you followed this process using that machine? I too haven’t had success using the the 5 hour Sourdough selection.
Thanks so much!
Thank you for all your tips. I would like a stronger sourdough flavour to my bread. Should I use less starter and prove at room temperature overnight before baking please?
Hi. This looks brilliant and I’m hoping to try this afternoon. Please however clarify – are we looking for 50% growth or 100% (double) growth during proofing? Also my machine has a max bake temp of 150C – how long would you recommend baking for 1X recipe and how long for a 2X recipe? Would using a thermometer to test internal temperature help? What temp would you expect to see when it is right? Thanks very much and am hoping I’m not too late in asking:)
I’ve tried this twice now with no rise, even though I had bubbly starter that doubles within 6 hours. Any suggestions?
I ran out of bread flour… I have all purpose or dark rye…????
this looks fantastic and so much easier than baking from scratch ! i am crossing my fingers I am successful first time! thanks much!
First time bread baker here! I’m confused about how the sourdough starter works. Do you make the sourdough starter first letting it rise then add it to the bread machine or add all of the ingredients to the machine at once?
This process also worked with 100 percent whole wheat. I got some starter from my son and did 2 cycles of feedings with fresh ground hard red wheat berries. Put it in my Panasonic YD sd250 machine on the dough cycle. Left it in the machine overnight to continue proofing. Baked in machine 1 hour 15 minutes. The only caution is to be very careful if you score it or maybe not at all. The gluten is not as strong as with white flour and it wants to collapse. But the result is worth it. Great sour flavor and a more European-like hearty texture.