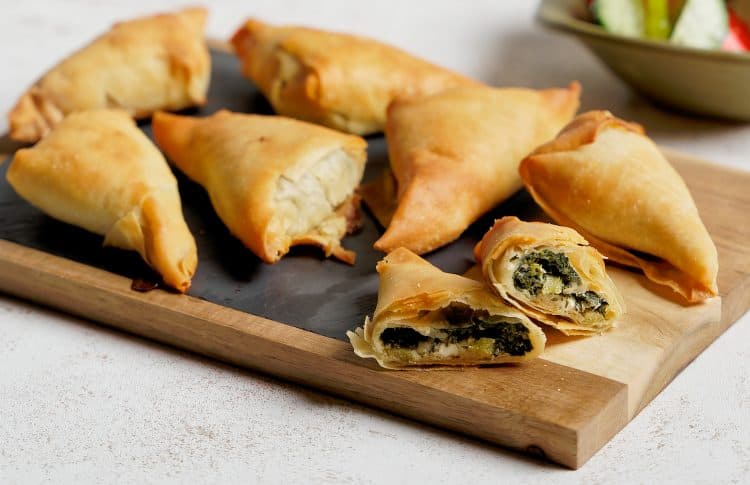
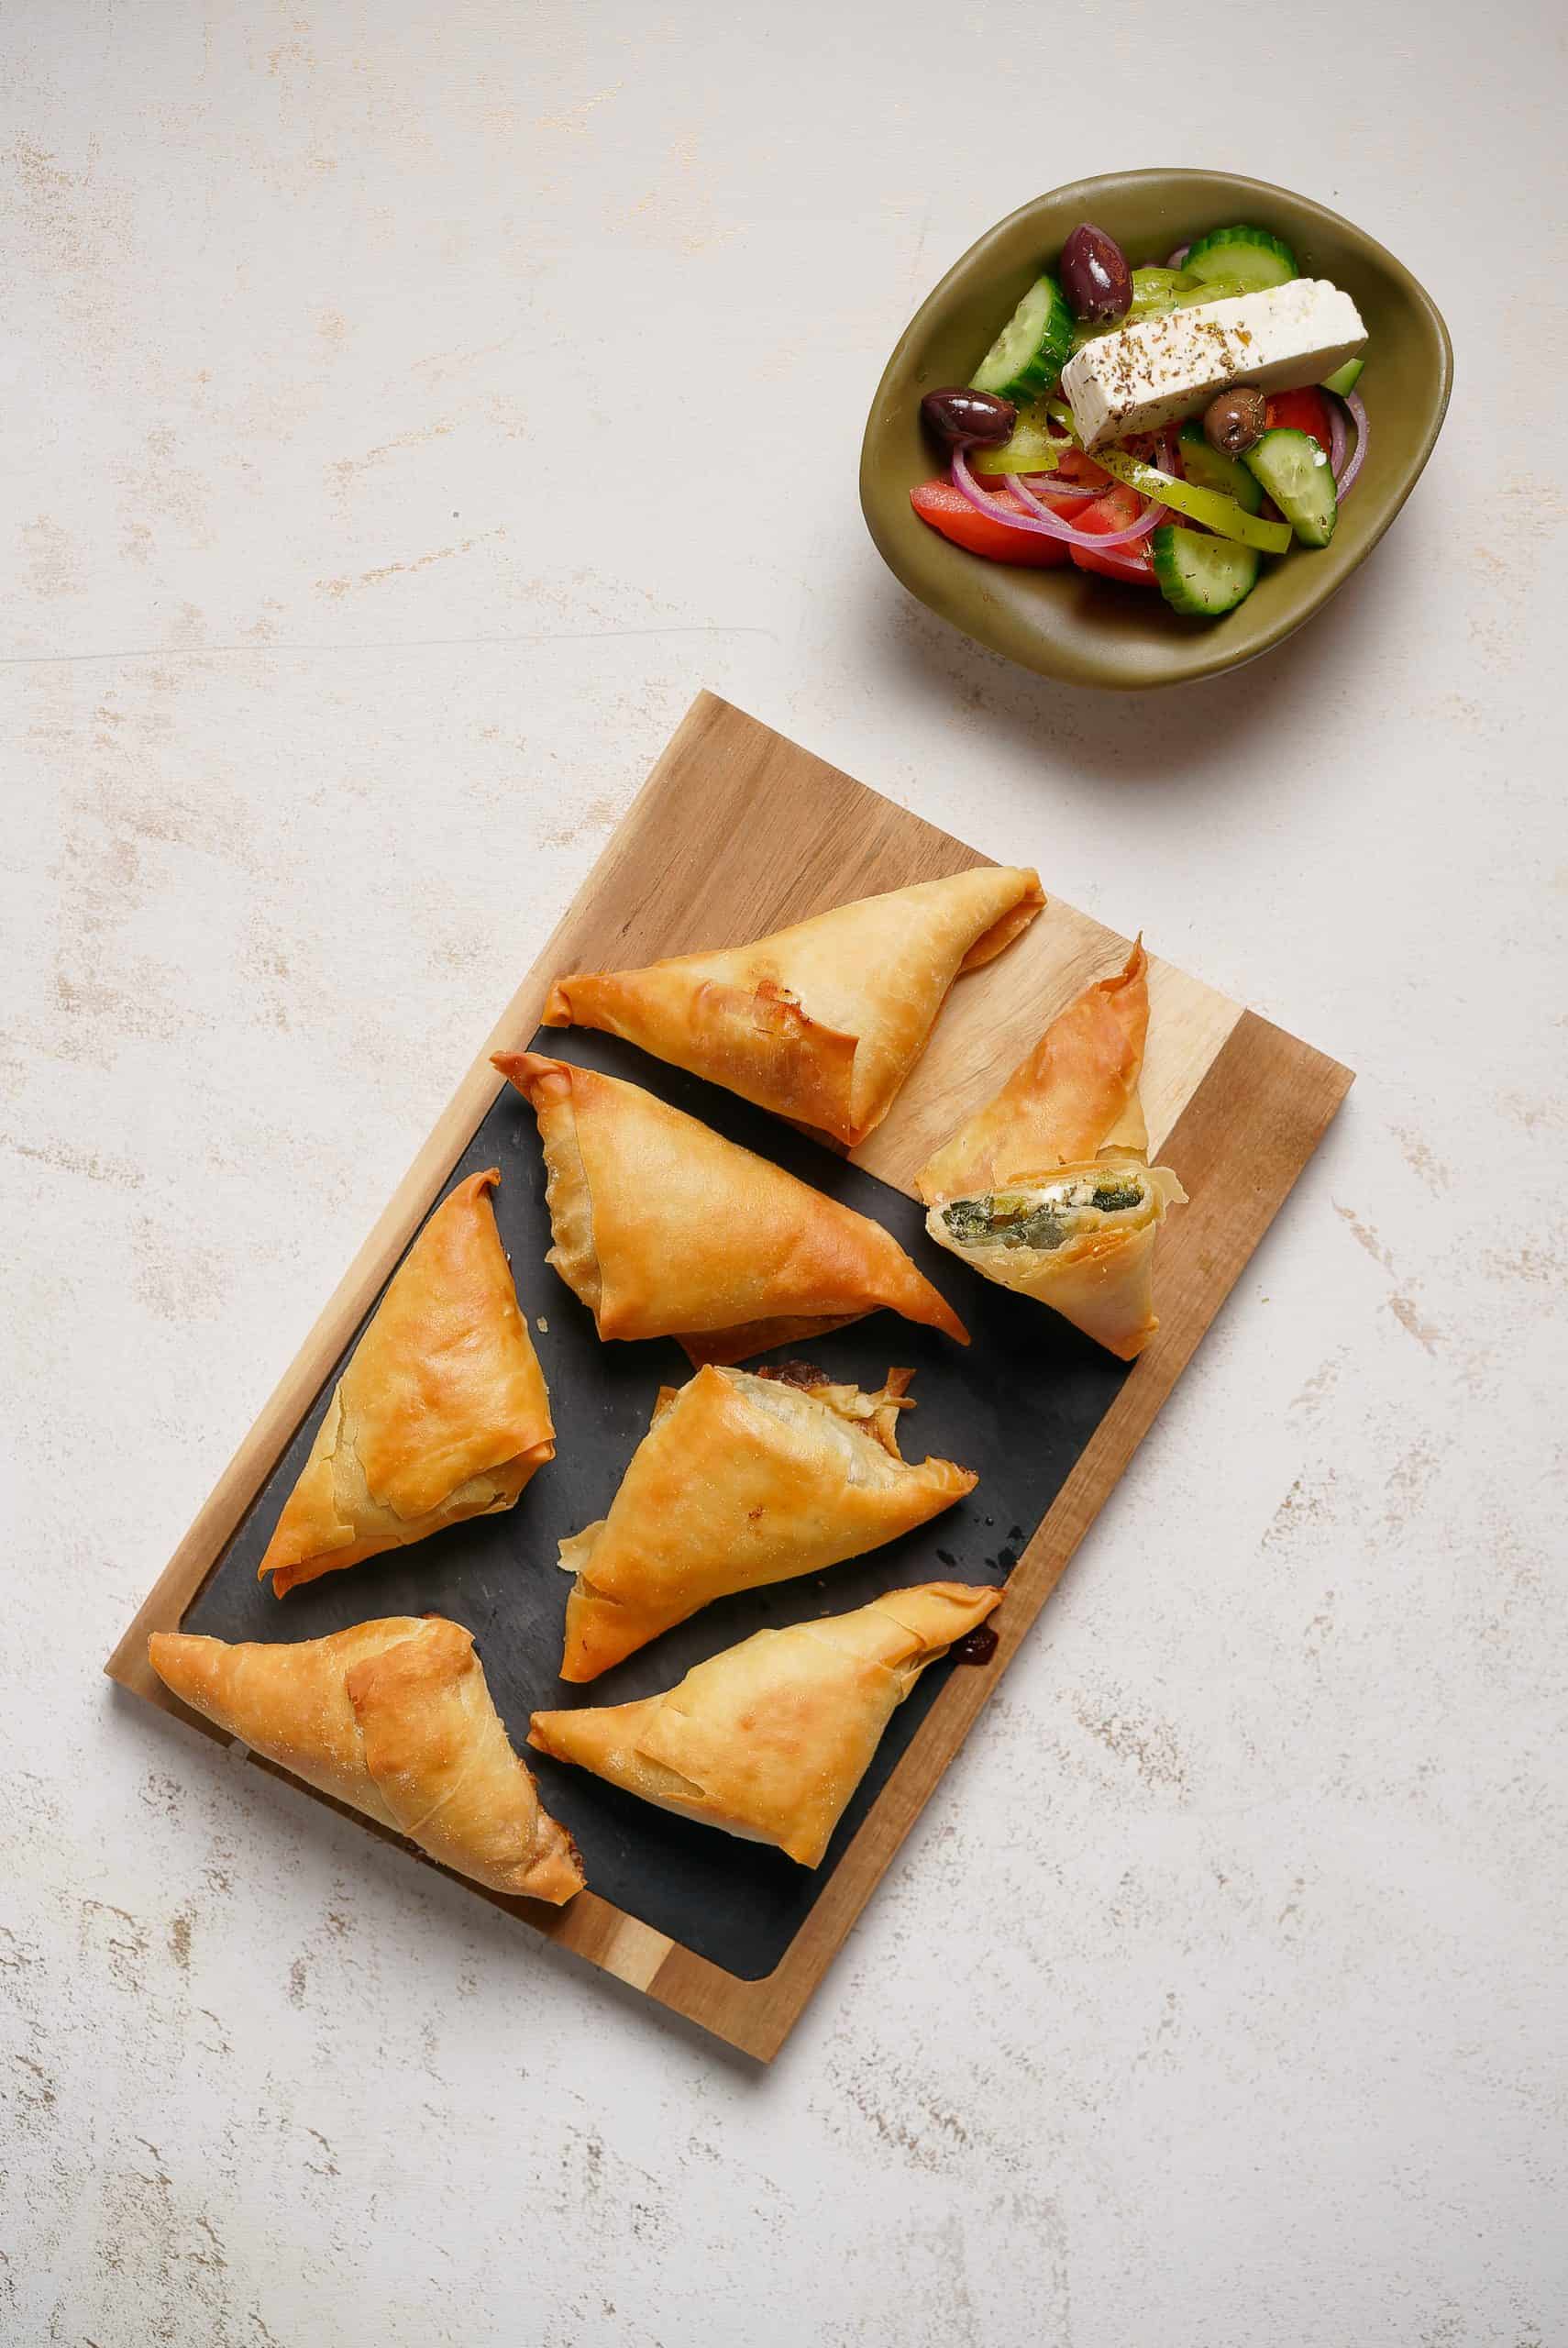
A super versatile traditional Greek spanakopita triangles recipe! These little treats are perfect for every time of the day as delicious starter, mid-day snack or light dinner!
So go ahead, read on to discover how to make them to perfection with my deliciousrecipe, tips and tricks and step by step photos!
What is Mini Spanakopita?
Spanakopita (Greek spinach feta phyllo pie) is commonly prepared in a large pan and then cut into individual portions. This spanakopitakia recipe is a variation of the traditional Greek spanakopita recipe, served as individual mini triangles. The itemised portions are far more versatile – they are the perfect finger food that is perfect to serve on a platter and also fits in your kids’ lunch box!
Perfect finger food: Smaller sizes mean you can add to a lunch box or they work great as party food
Vegetarian: This recipe is great for vegetarians or when you want to cut back on the meat!
What you’ll need to make Greek Spinach Triangles the traditional way
If you haven’t tried Greek spanakopita triangles before, then you are certainly missing out! Why? Because they are crispy, juicy and stuffed with a herby, tangy spinach-feta mixture! These mini spanakopita triangles are like no other vegetarian pie you’ve ever tried before!
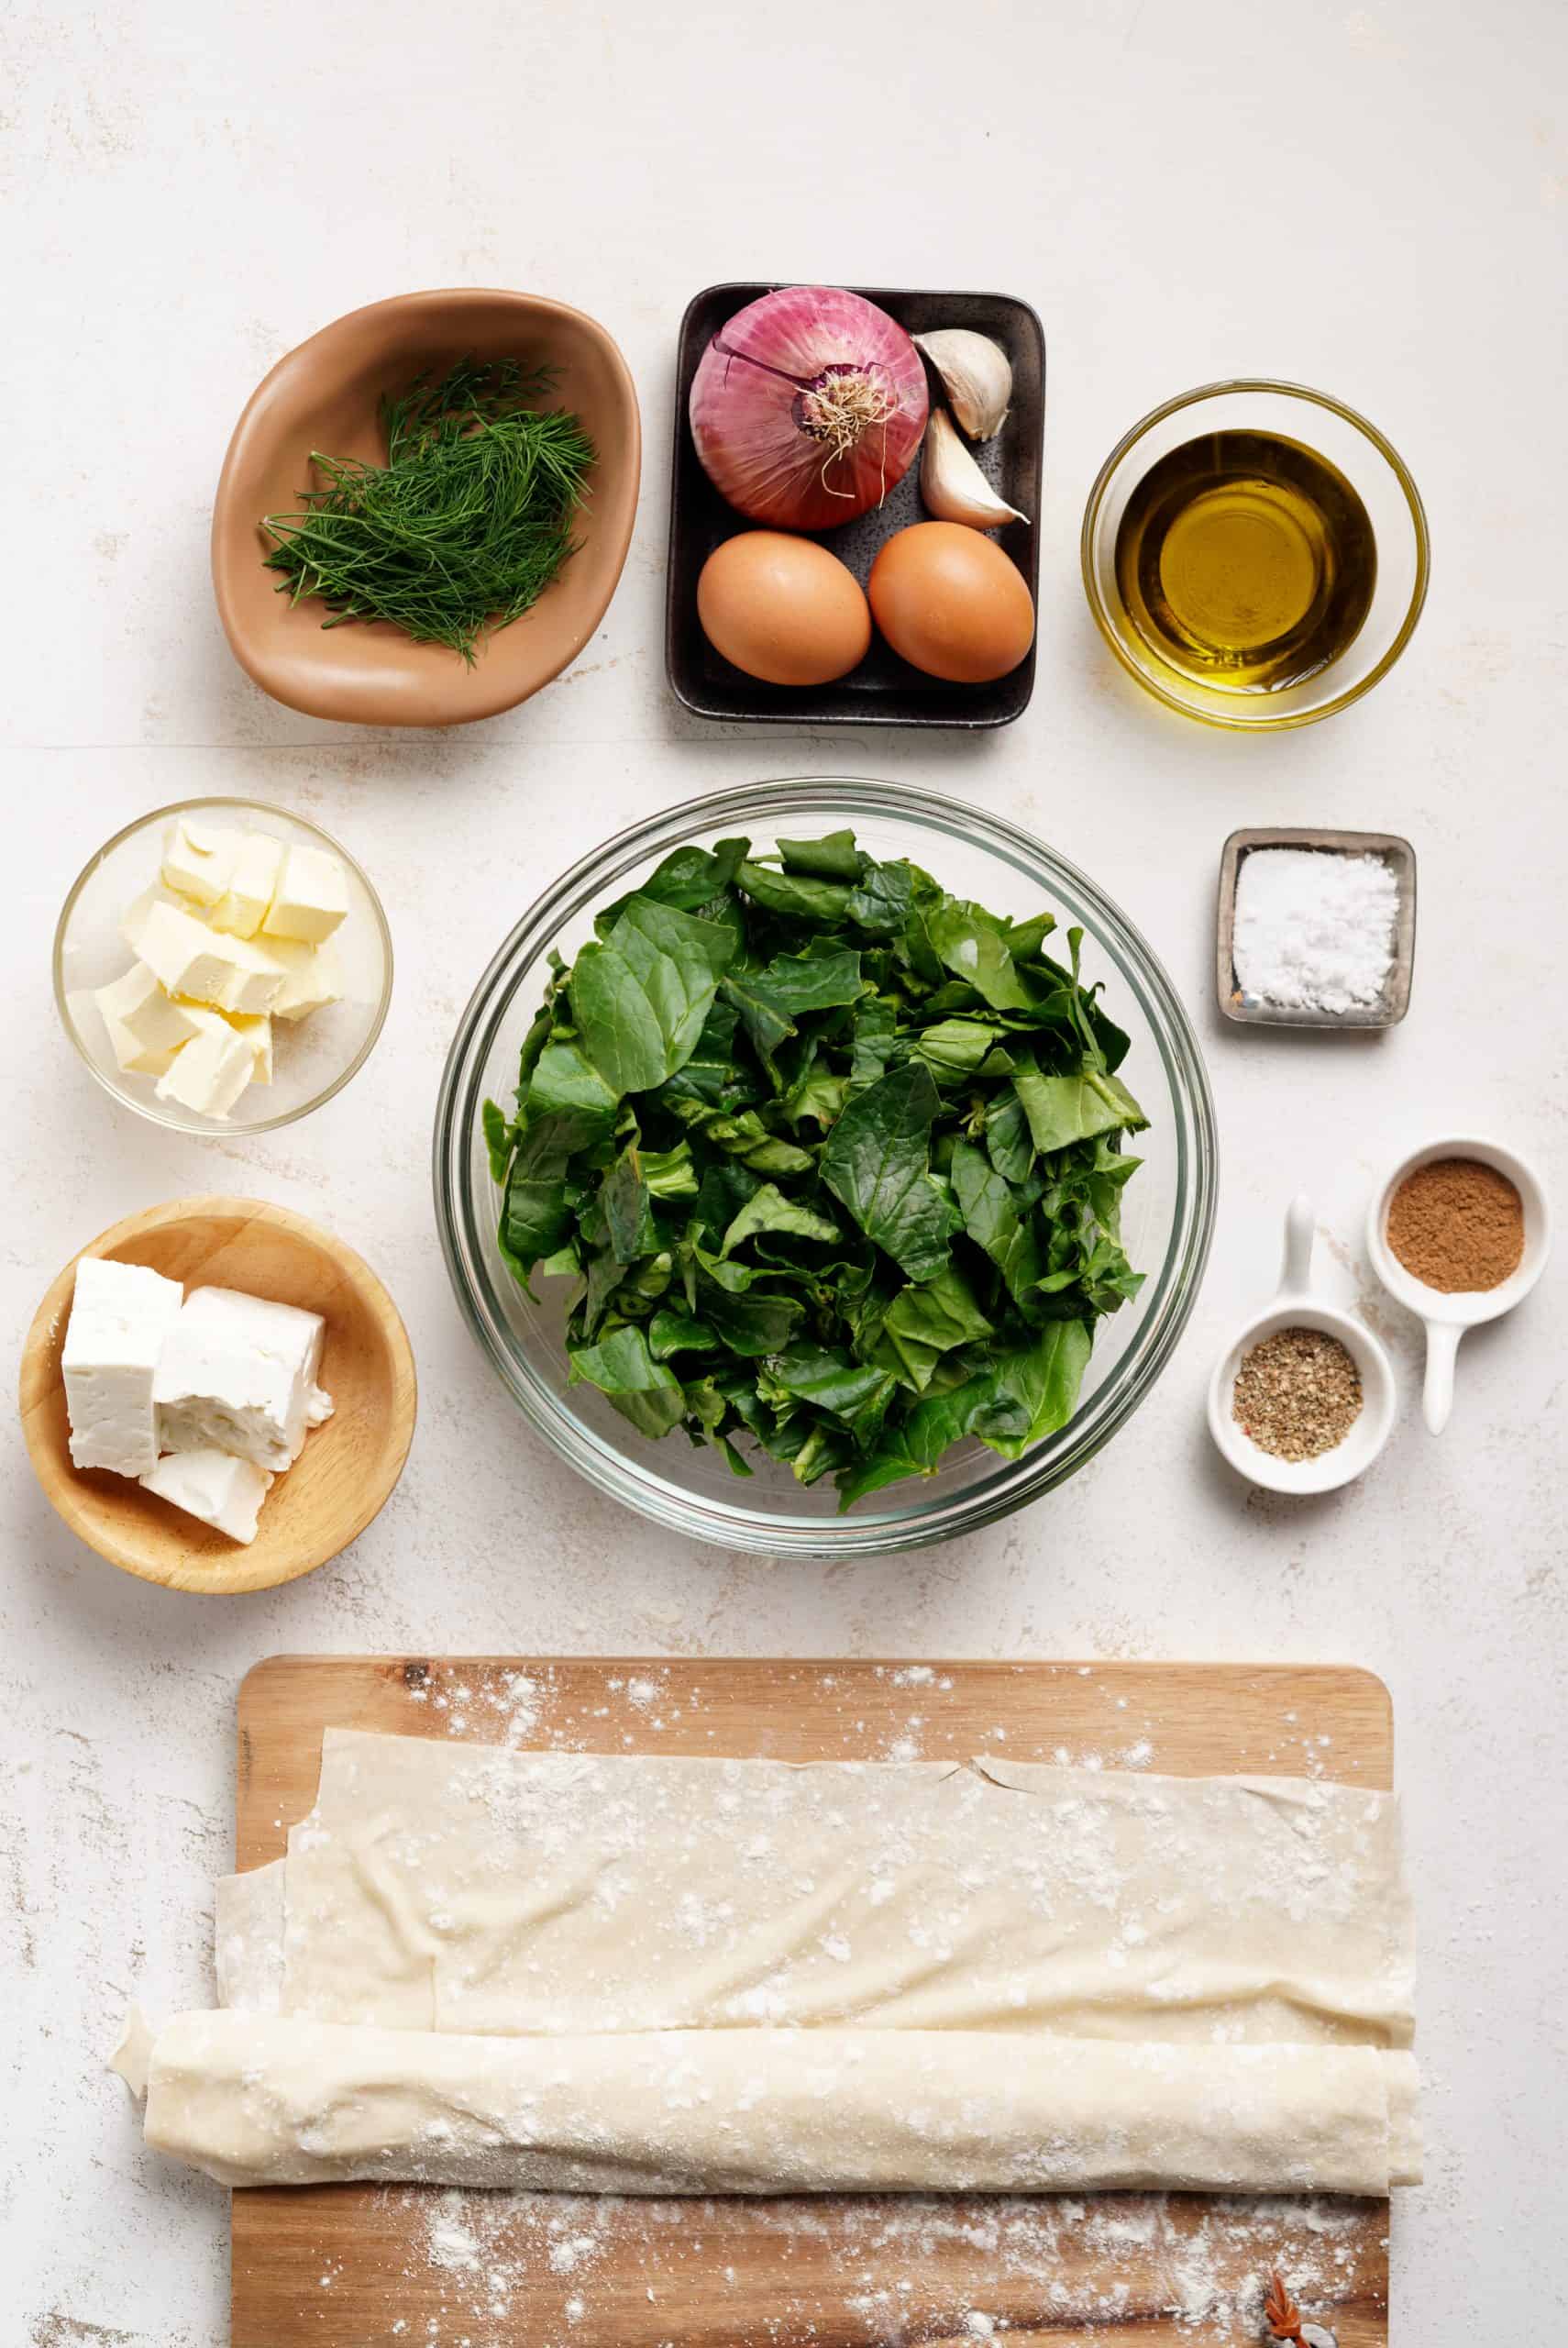
Spinach: The main ingredient you’ll need to make this spanakopita triangles recipe is -what else- spinach. Fresh works best but you can also use frozen. Just make sure to defrost it in the microwave or in your hob before adding into the pan
Filling: Spinach is the key ingredient but not the only thing in these triangles. There’s garlic, cheese, eggs, nutmeg, spring onion in it as well as some butter to cook the ingredients with
Fresh herbs: You can play around with fresh herbs in the mixture but my favorite is fresh dill.
Phyllo dough: You’ll want ten sheets for this recipe, either store-bought or homemade.
Key Preparation Steps and Tips
My spanakopitakia recipe is super simple with just a few steps involved:
Prepare the filling
Prepare the dough and shape them
Bake the spinach pie triangles
Tip: If you’re a beginner with phyllo, check out some helpful handling tips before start preparing this spanakopita triangles recipe.
Prepare the spinach filling
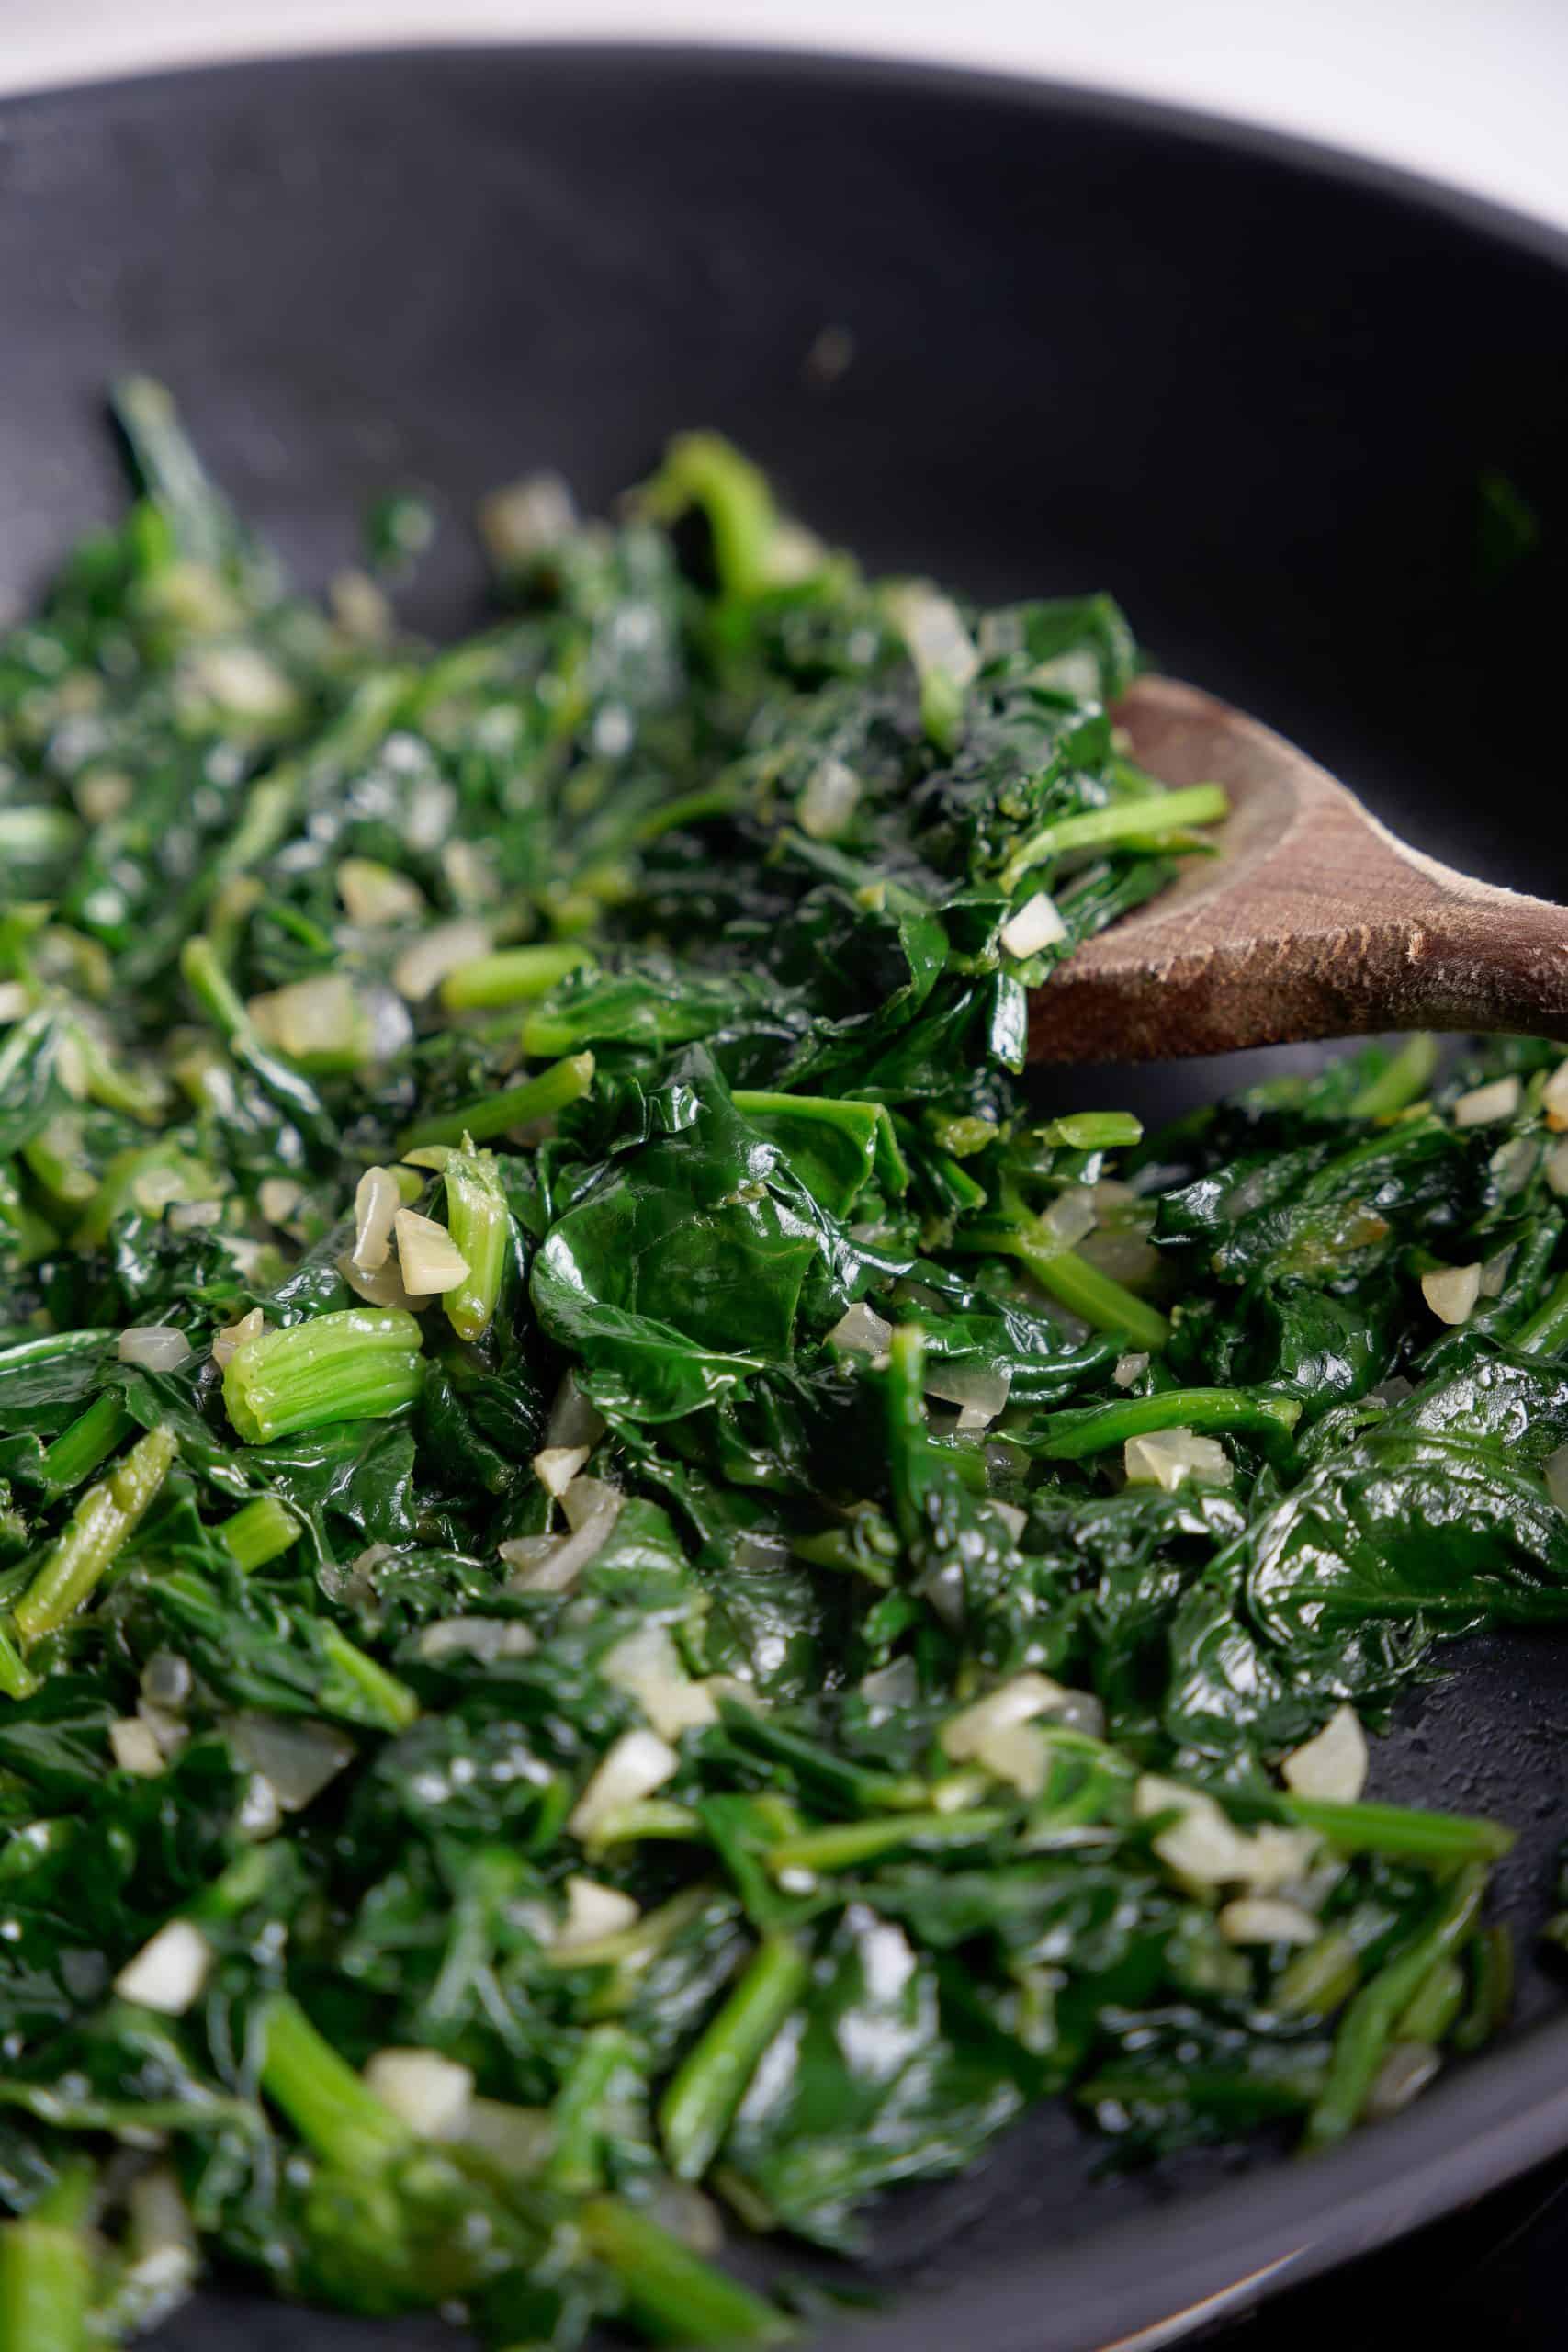
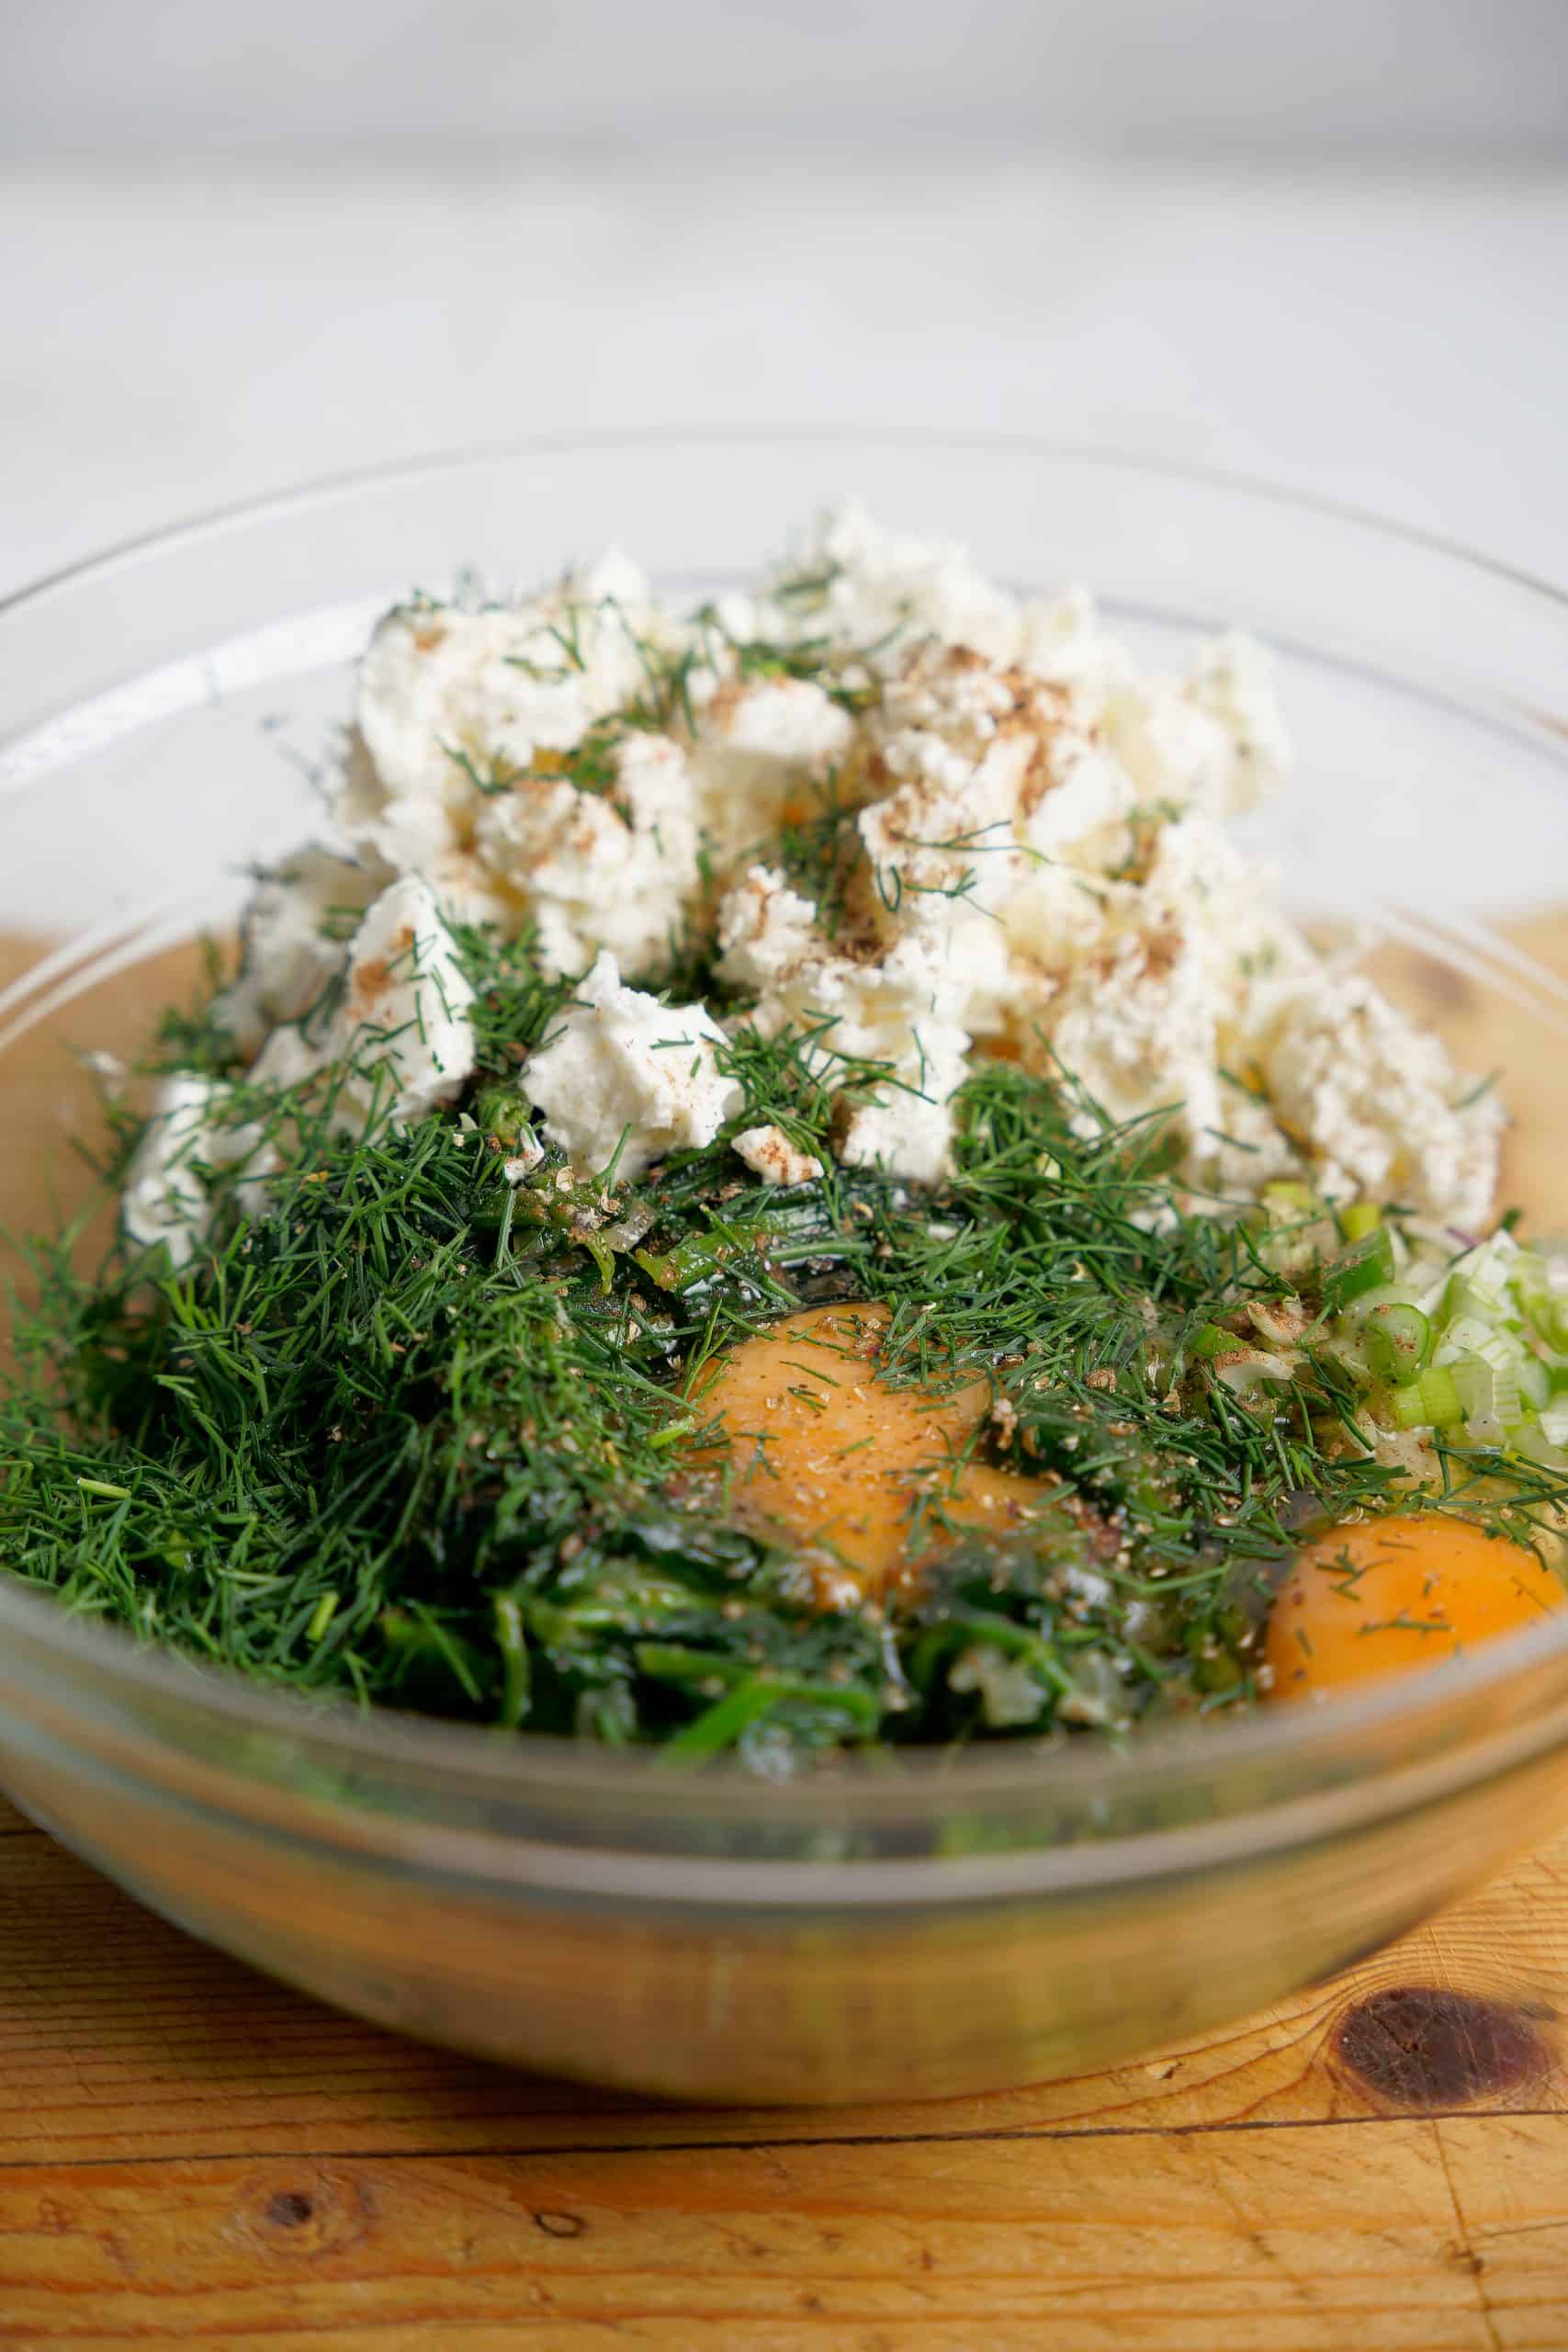
To make this spanakopita triangles recipe, start by preparing the filling. Sauté the onions in a large knob of butter or olive oil until soft and golden brown.
Add the garlic and cook for a couple of minutes longer. Stir in the spinach one portion at a time and allow it to wilt before adding more.
Remove from the heat and set aside to cool for a few minutes. Tip into a mixing bowl, taking care not to add much of the spinach liquid – you don’t want your spanakopita triangles to get mushy!
Finally, add the feta cheese, eggs, nutmeg and spring onion in the bowl, then season. This is where you can add the fresh herbs you chose as well.
Prepare the phyllo dough and shape the spanakopitakia
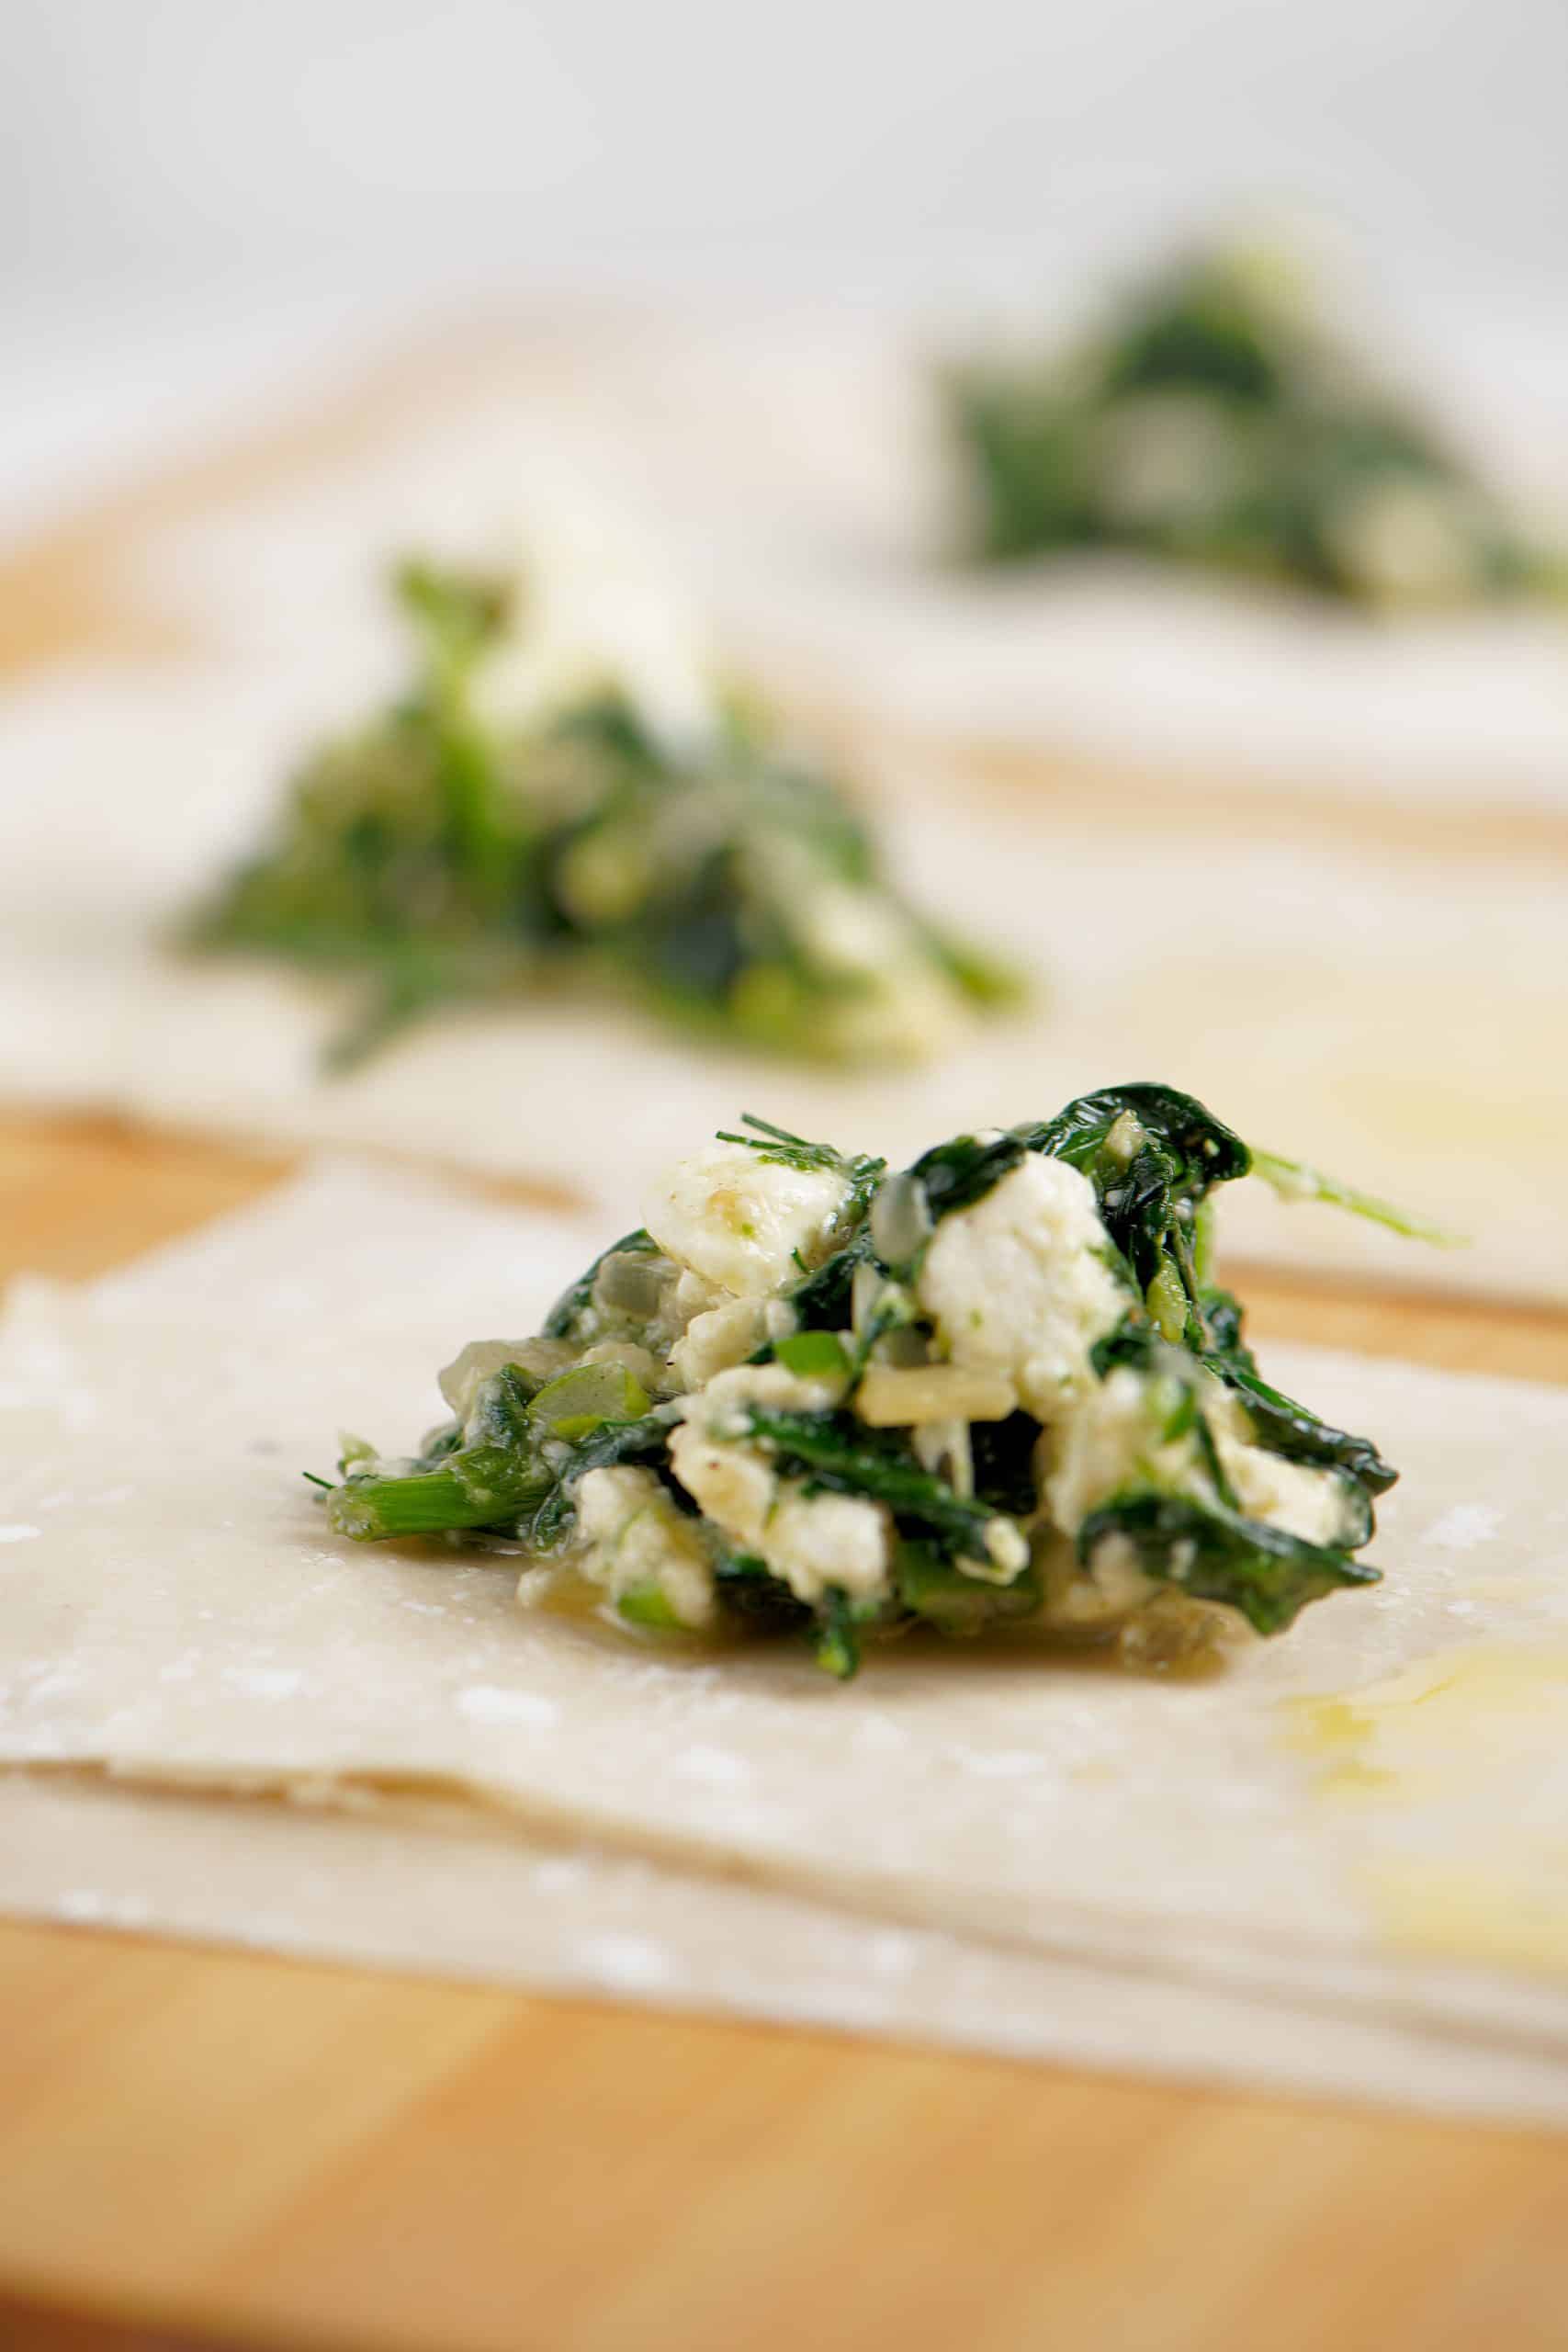
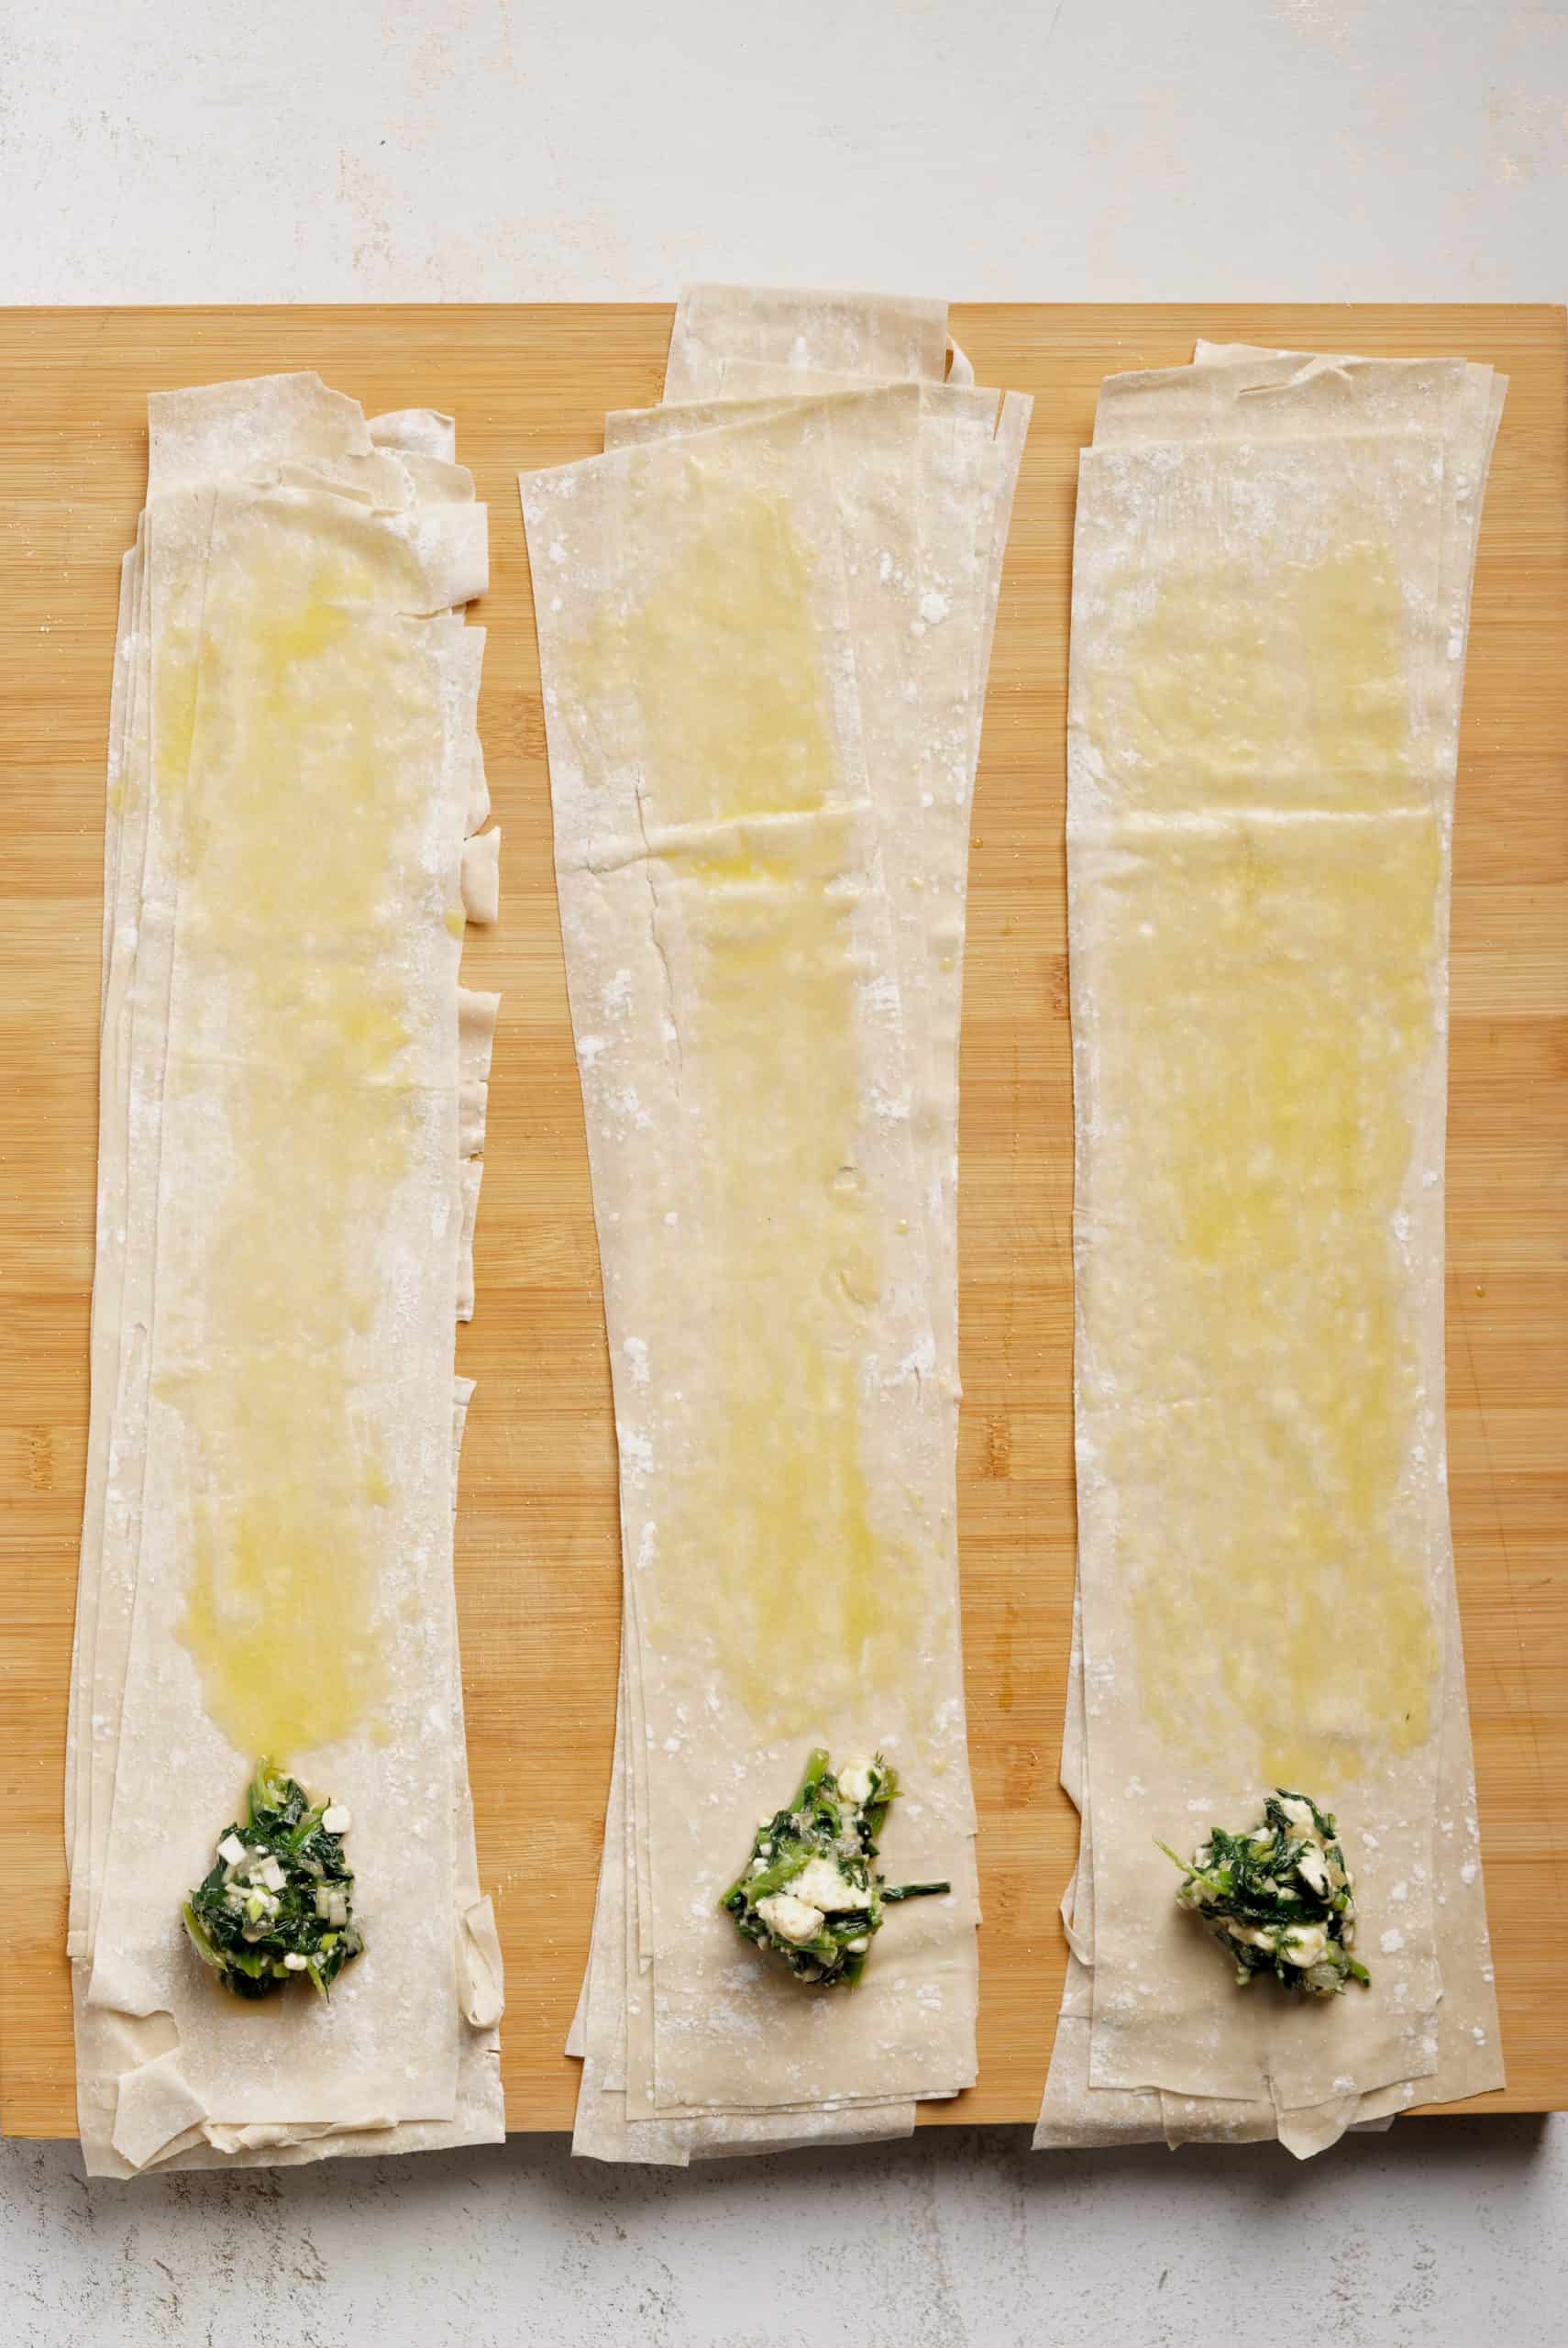
Once your filling is ready, its time to start preparing the phyllo dough. Start by placing one sheet of phyllo on a work surface and brush it with melted butter or olive oil using a cooking brush. Spread another sheet of phyllo dough over the top and drizzle with some more butter.
Cut the phyllo into 3-4 “lanes”, depending on whether you want the spanakopita triangles to be small or larger. At the end of each lane, add one tablespoon of filling.
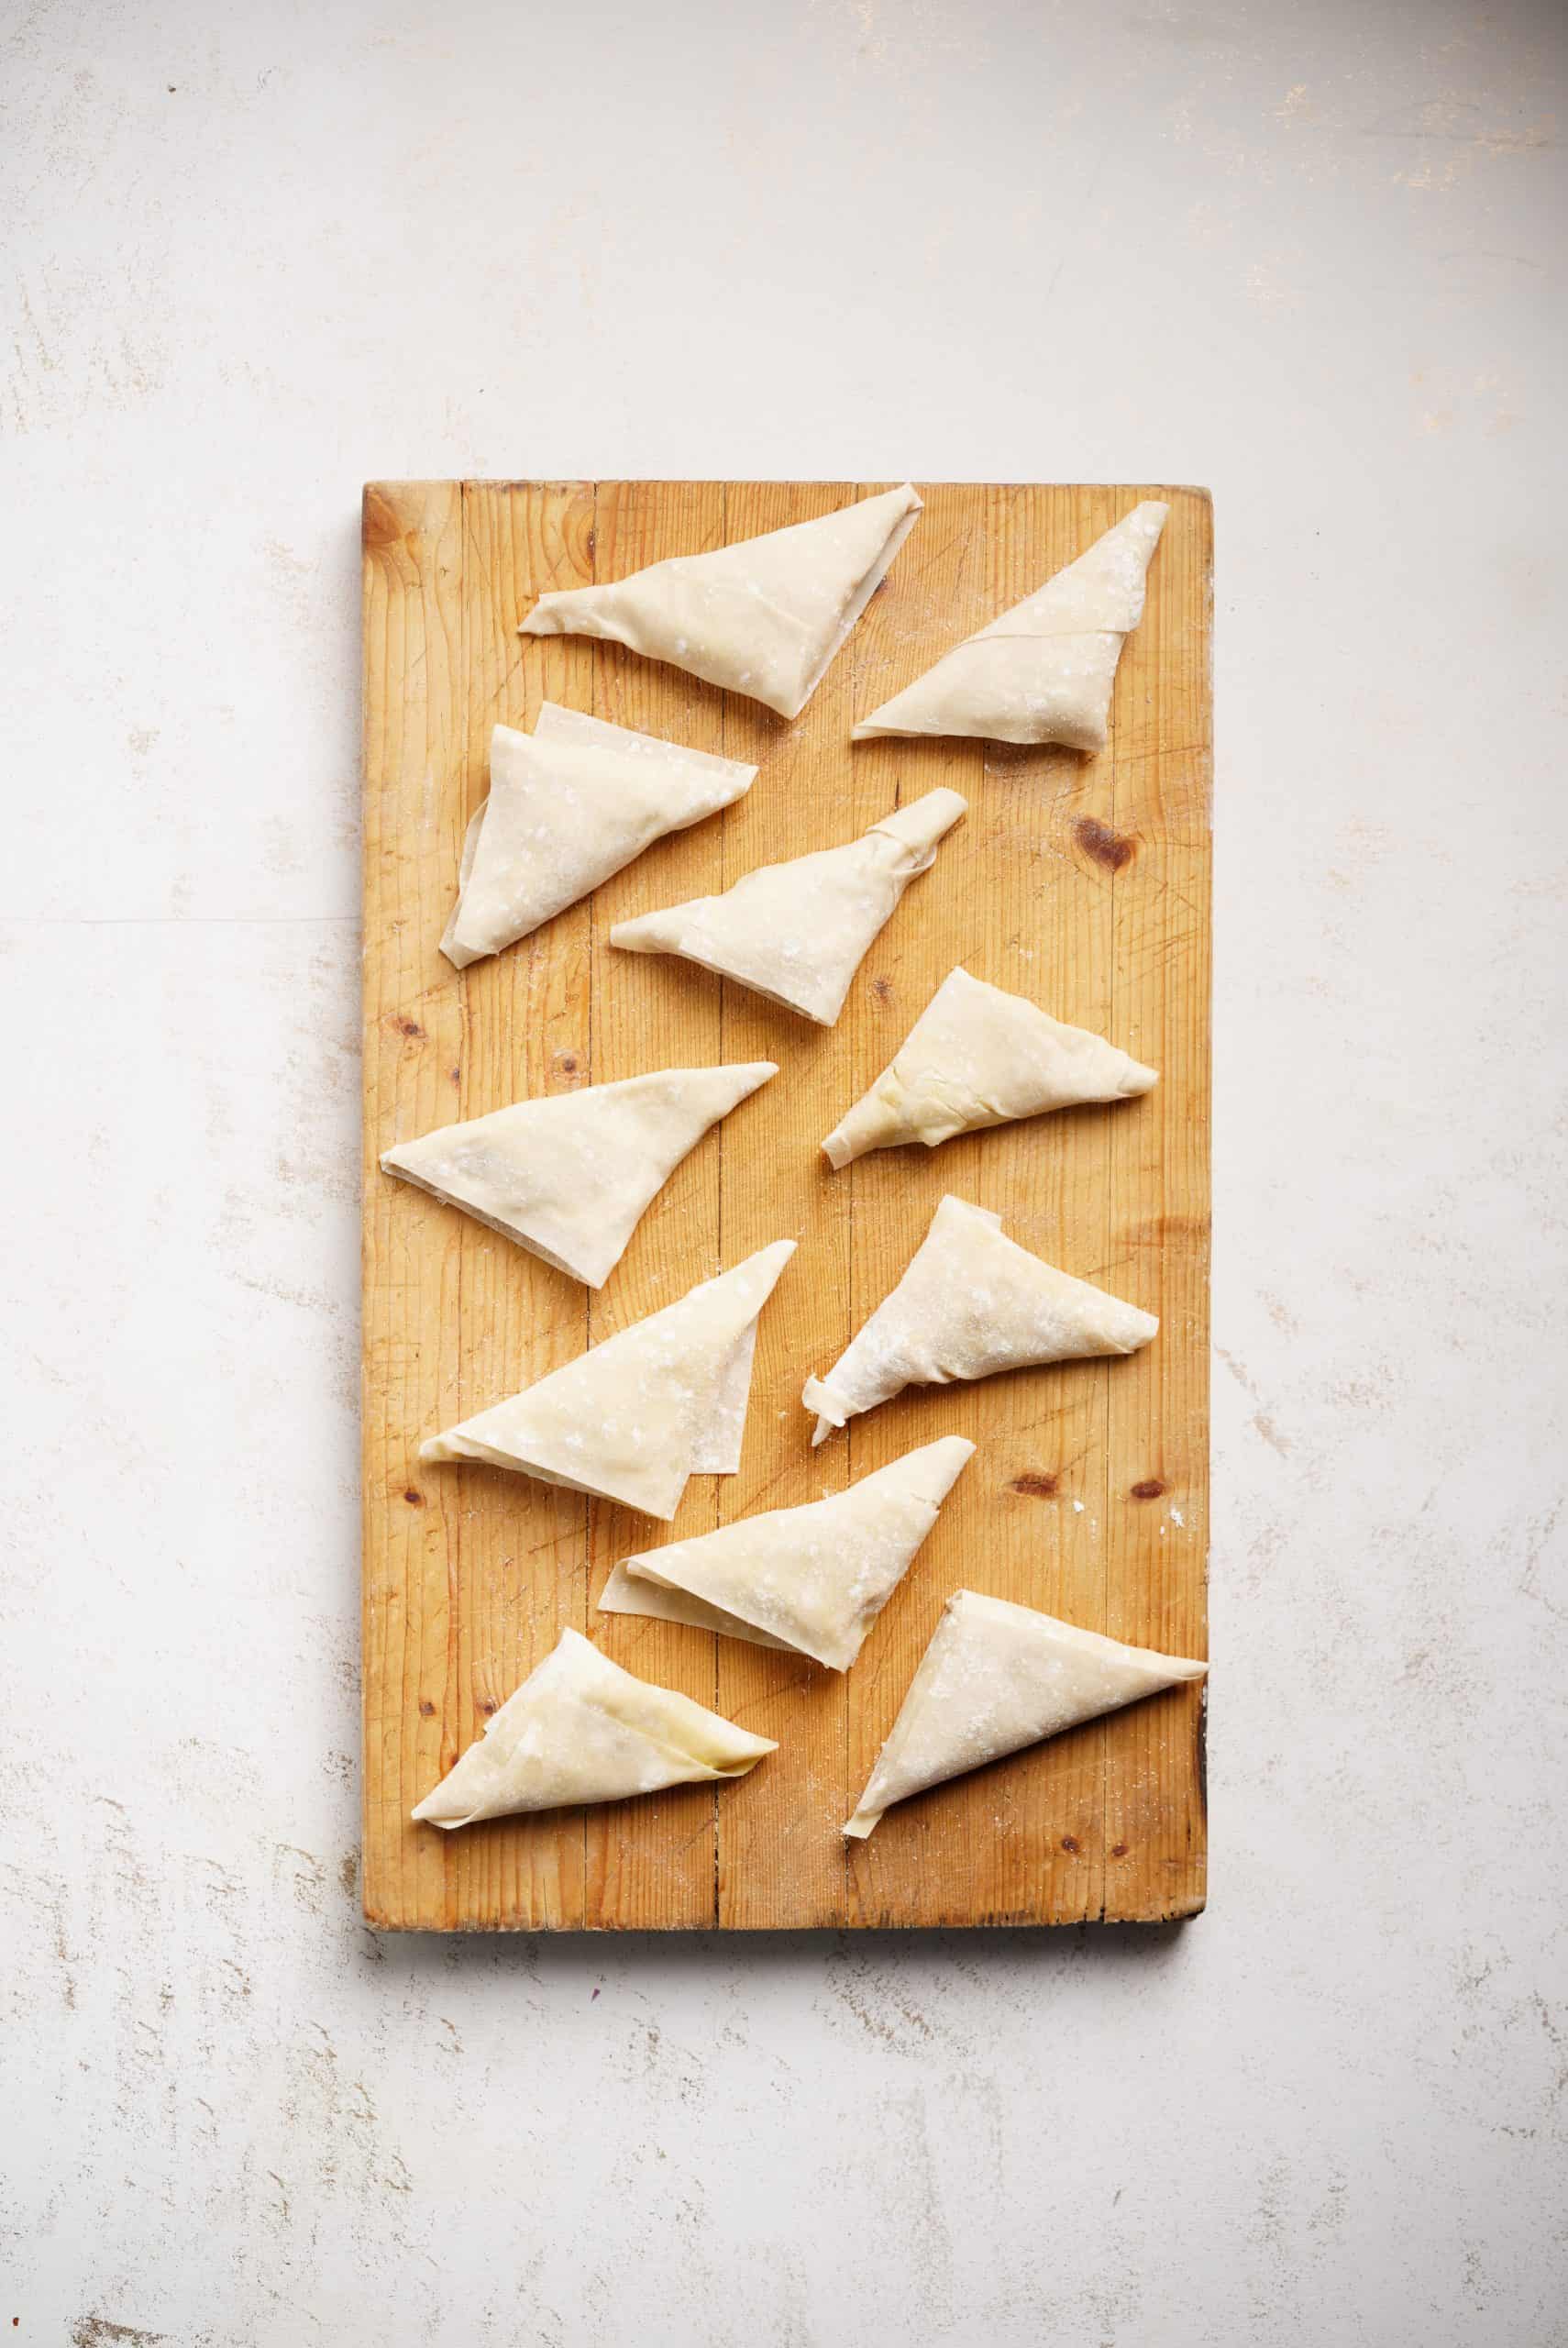
Fold one corner to create a triangle and fold the triangle again onto itself until the entire piece of phyllo is used. Continue with the other phyllo sheets and filling.
Bake your spinach pie triangles
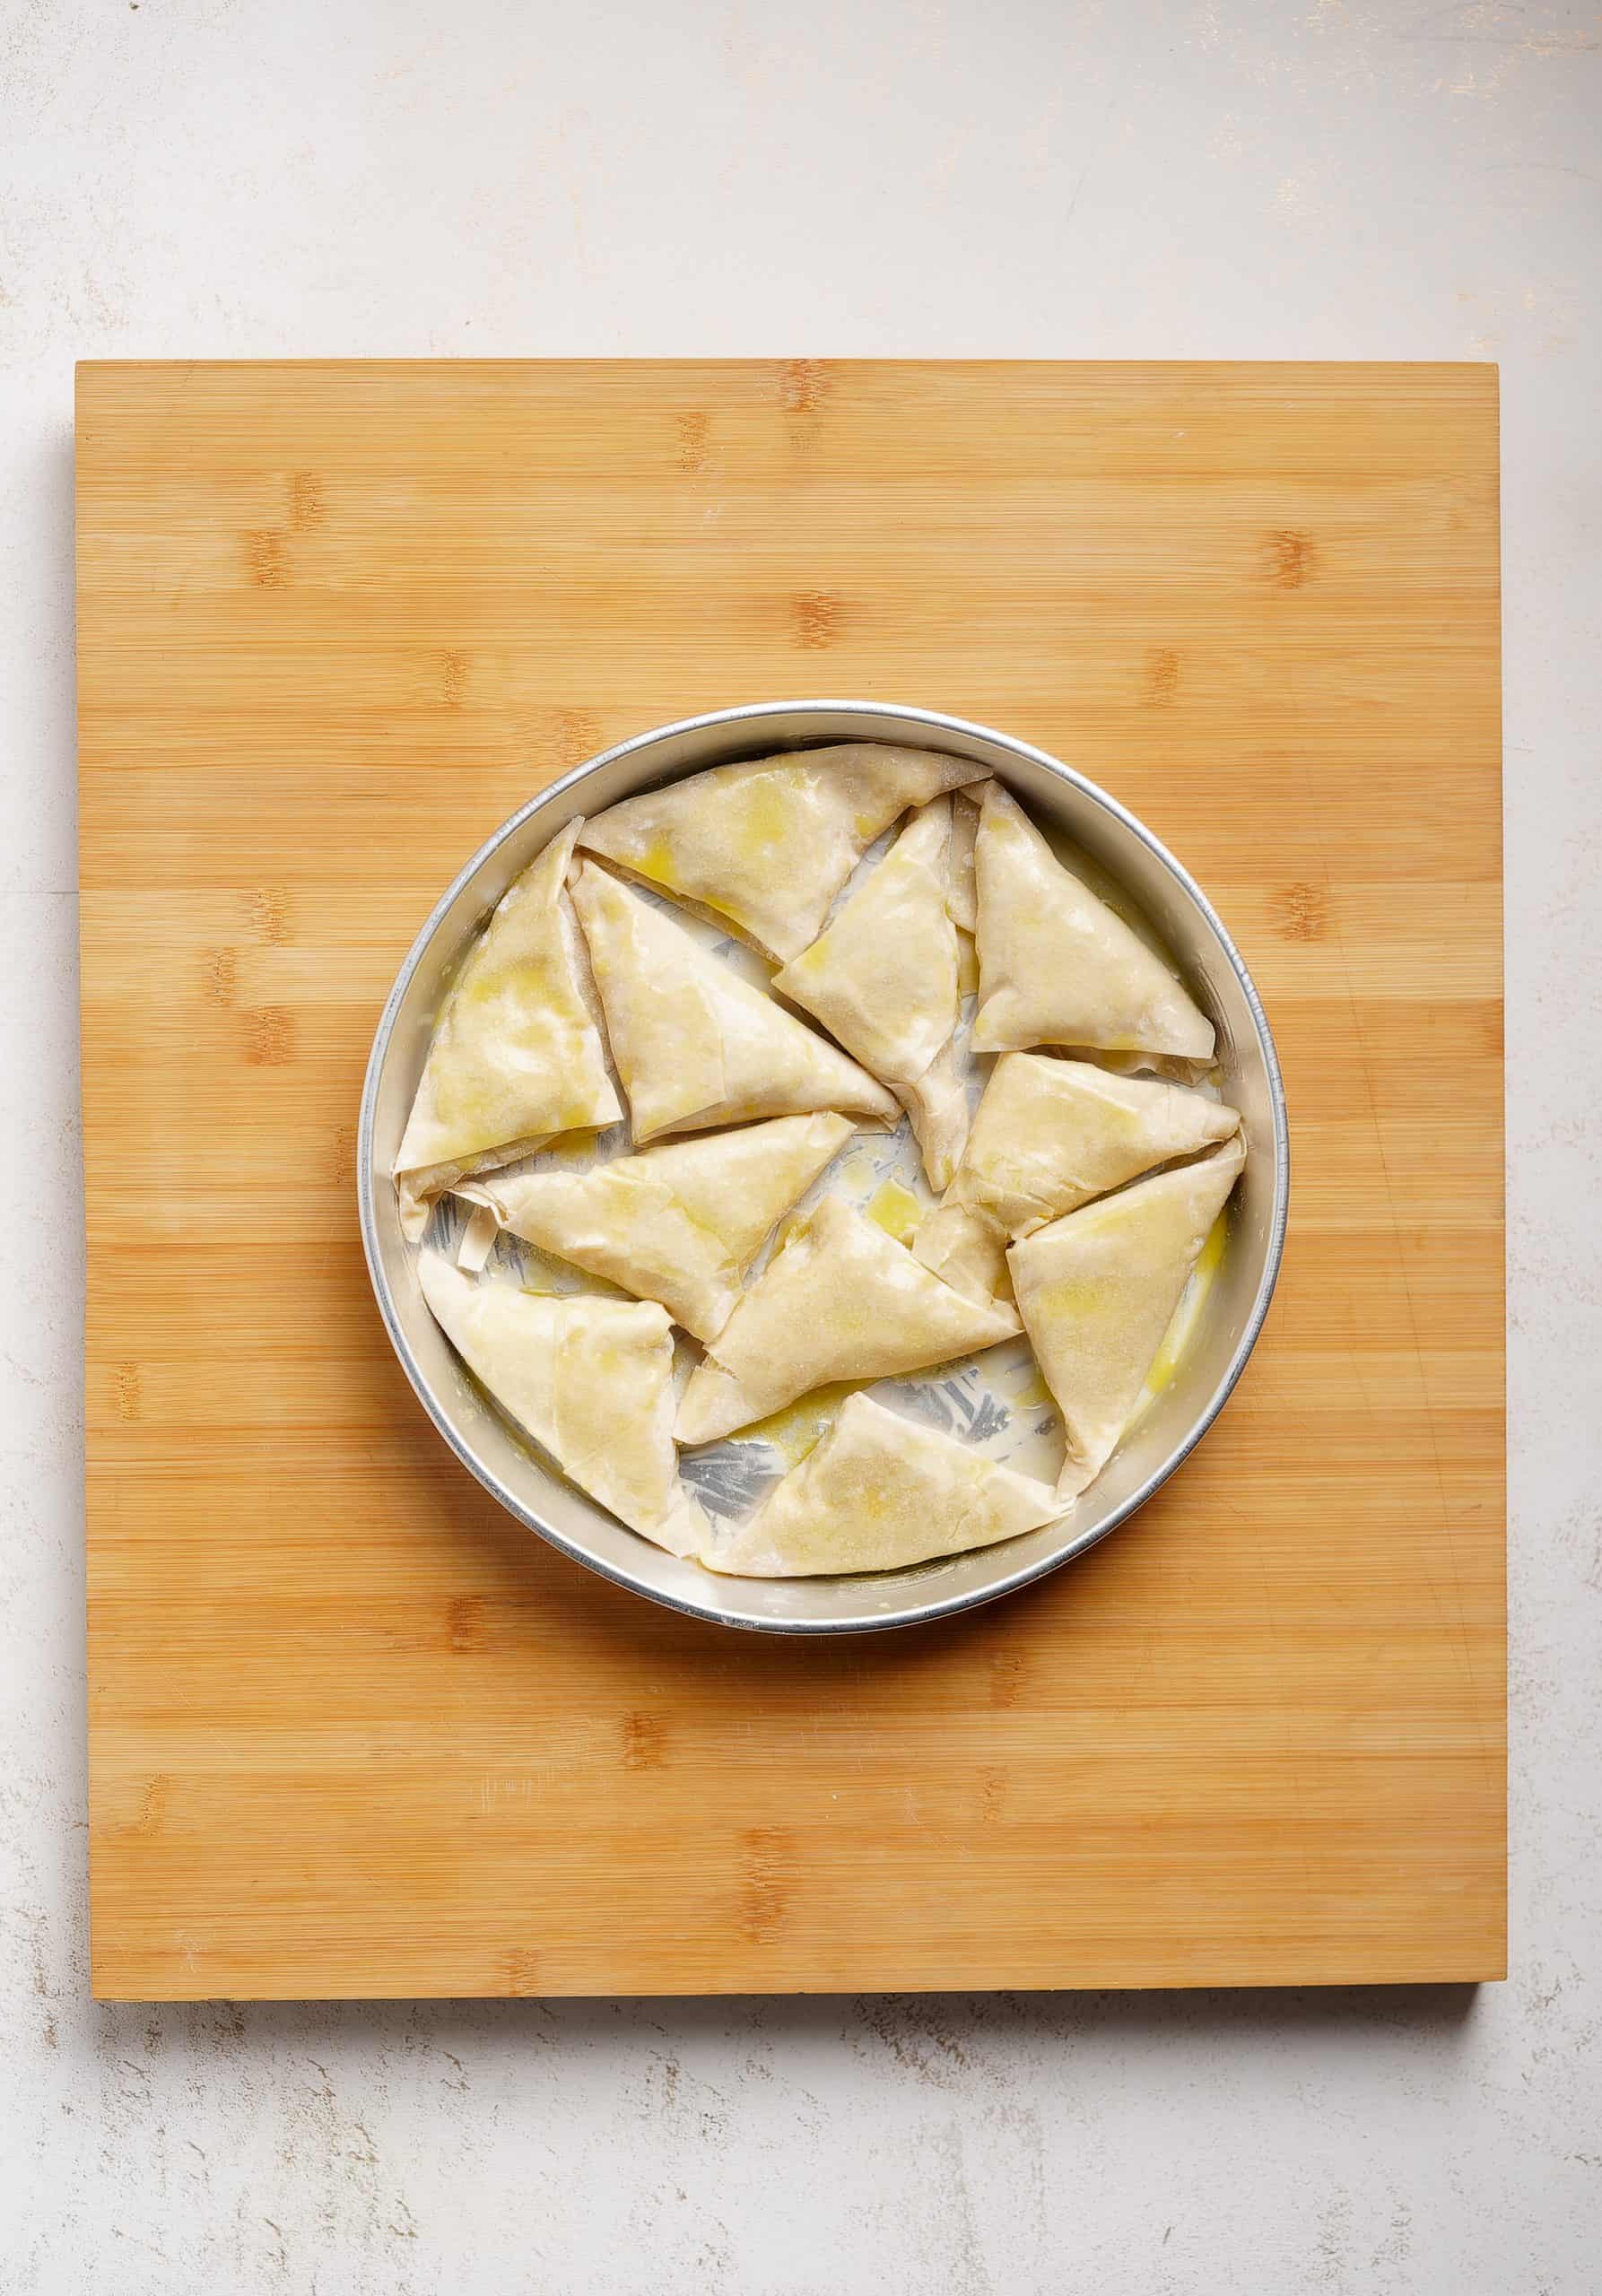
Once you’re done shaping your spanakopitakia, get your baking tray out and brush generously with some melted butter. Layer the spanakopitakia on your baking tray and then brush them with some melted butter on top.
Finally its time to bake them! Preheat your oven to 180C/350F and bake for 25-30 minutes until golden and crisp!
How do you make your own phyllo pastry?
To prepare this spanakopita triangles recipe you could use either commercial phyllo dough or, if you are feeling adventurous, give a more rustic touch with your own homemade phyllo dough with my homemade phyllo for beginners recipe. Whichever you end up using, there is one thing for sure! That they will reward you with a crispy, flaky and simply delicious crust!
So go ahead, prepare these mini spanakopita triangles and you will surely agree that there is nothing better than the smell of a freshly baked, hot from the oven, homemade pie!
Variations
Spinach, feta, and phyllo dough are the typical spanakopita ingredients. However, if you don’t have all of them on hand, there are alternatives.
Ricotta cheese is a popular substitute for feta cheese. Ricotta, even though it is sweeter than feta, crumbles similarly. To achieve a salty-sweet taste, use a balance of equal parts feta and ricotta.
For a puffier, more buttery crust, try using pastry puff instead of phyllo dough. Cut the pastry puff into triangle shapes. Spoon the spinach and cheese mixture between two layers of pastry puff and press down the edges with a fork. Instead of olive oil, brush with an egg wash.
Making ahead of time and storing
Spanakopita that has been baked may be kept at room temperature for up to six hours before serving. They could also be refrigerated but they will loose some of that crispiness that I love.
If you want to make them in advance, there are two ways you can do that:
Prepare the filling in advance and keep it refrigerated for up to a day. Then shape and bake on the day
Prepare them up to the point of baking and freeze them. To make sure they don’t stick to each other when frozen, I add the triangles to a baking tray with parchment paper and put them in the freezer for about 30 minutes uncovered. This firms them up as the liquids turn into ice. Then remove them from the freezer and place them in a large airtight container, layer by layer. In between the layers, use pieces of parchment paper to prevent them from sticking together. Then pop them in the freezer, where they will last for up to 1-2 months.
If you have chosen to freeze them, you don’t need to defrost them before baking. Simply remove your spanakopitakia from the freezer, place them on a large baking tray and bake in a preheated oven (180C/350F) for 30-40 minutes.
Serving suggestions
Serve these delicious traditional Greek spanakopita triangles as a great starter together with a Greek feta salad aside.
More delicious Greek Pies and Spinach Recipes!
If you love a traditional Greek pie, the below recipes are made for you!
So go ahead, prepare these mini spanakopita triangles and you will surely agree that there is nothing better than the smell of a freshly baked, hot from the oven, homemade pie!
A super versatile, traditional Greek spanakopita triangles recipe (spanakopitakia)! These little treats are perfect for every time of the day as delicious starter, mid-day snack or light dinner! Discover how to make them to perfection with this traditional recipe.
Ingredients
Scale
10 sheets of phyllo dough
500g spinach, washed and roughly chopped (18 ounces)
If you’re a beginner with phyllo, check out some helpful handling tips before start preparing this spanakopita triangles recipe.
To prepare this spanakopita triangles recipe start by making the filling first. Sauté the onions in a large knob of butter or olive oil until soft and turning golden. Add the garlic and cook for a couple of minutes. Add the spinach in batches and cook until wilted.
Let the mixture cool down for a while and then tip into a bowl, leaving behind any excess liquid from the spinach (you don’t want your spanakopita triangles to become mushy). Mix in the feta cheese, eggs, nutmeg, spring onion and season. At this point you can add some chopped fresh herbs if you like; some fresh dill will surely lift the flavour. This will be the filling of the spanakopita triangles.
Preheat the oven to 180C and start shaping your spanakopita triangles.
Spread one sheet of the phyllo dough on the kitchen counter and with a cooking brush drizzle with some melted butter or olive oil. Spread one more sheet on top and drizzle with some more butter.
Cut the phyllo sheets in 3-4 lanes (depending on if you like the spanakopita triangles to be small or larger). At the end of each lane add one tablespoon of the filling. Fold one corner to form a triangle and continue folding the triangle upon itself, until the entire piece of phyllo is used. Continue with the rest phyllo sheets and filling.
Oil the bottom of a large baking tray, place the spanakopita triangles and brush them with some melted butter on top. Bake in preheated oven at 180C for 25-30 minutes, until golden and crispy.
Serve these delicious traditional Greek spanakopita triangles as a great starter with a Greek feta salad aside. Enjoy!
Nutrition
Serving Size:1 triangle
Calories:90kcal
Sugar:1.2g
Sodium:315.9mg
Fat:4.7g
Saturated Fat:2.6g
Unsaturated Fat:1.8g
Trans Fat:0g
Carbohydrates:8.4g
Fiber:1.1g
Protein:3.9g
Cholesterol:30.2mg
Keywords: Spanakopita triangles, Spanakopitakia recipe, Mini Spanakopita parcels, Greek Spinach and Feta triangles
hi I have just made some and froze half and cooked half first then froze. How did you find what ever you did.
I was told freeze b4 cooking to preserve flavor and just cook once.
Seriously delicious! Never cooked these before but the recipe was easy to follow and my results weren’t too bad. May even make my own phyllo next time!
Although a bit fiddly to make the triangles were delicious. I also added about 25grams of toasted pine nuts which add to the flavour and are included in some other Spanokopita recipes. As these are mini triangles I think the recipe is wrong as 1 tablespoon of filling would make a huge triangle. I put a generoush teaspoon in mine and the recipe made 30 mini triangles. I also sprinkled sesame seeds over the triangles before they went in the oven.
Freeze before you bake if you want or bake one batch, plate, bake second batch etc and then serve cold. They are equally amazing (if not better) served at room temperature!
I was quite nervous about these – never worked with philo before. The triangles turned out great! Tasty and quite pretty! The store-bought pastry made 22 pieces. I only used 2/3 of the filling. In future, I’ll only add the one egg and cut back on the other filling ingredients. I baked at 350F for 26 min. Thanks for the wonderful recipe!
Over the past 8 years you have made My Greek Dish the number one destination for anyone searching for authentic Greek recipes! For that I cannot thank you enough!
It all started with an idea… To collate and publish all those recipes that I loved when I was young, the ones I made with so much love for my children and grand children!
So go ahead, explore my delicious collections and don’t forget to leave me a comment, connect with me on Facebook or Instagram and sign up to my mailing list so you never miss out on my latest creations!


")
")
")
")
")
")
")
ridiculous oven temperature 180C Maybe on Mars!
180c works just fine for me
180C is 356F…
how long can these sit for and where do yo keep them? i need an answer asap
i need an answer
Tough toenails.
??
hi I have just made some and froze half and cooked half first then froze. How did you find what ever you did.
I was told freeze b4 cooking to preserve flavor and just cook once.
absolutley love spanakopita i am greek so i eat it all the time
for a fact the greeks invented italian
Seriously delicious! Never cooked these before but the recipe was easy to follow and my results weren’t too bad. May even make my own phyllo next time!
Made them and loved them!!!
Although a bit fiddly to make the triangles were delicious. I also added about 25grams of toasted pine nuts which add to the flavour and are included in some other Spanokopita recipes. As these are mini triangles I think the recipe is wrong as 1 tablespoon of filling would make a huge triangle. I put a generoush teaspoon in mine and the recipe made 30 mini triangles. I also sprinkled sesame seeds over the triangles before they went in the oven.
Making one day ahead , refrigerate and cook next day will it effects quality?
It may end up drying the phyllo. If I where you I’d freeze them, even for 1 day as the phyllo will remain crisp that way.
Looking forward to making this. Serving a crowd so will triple the recipe. Should I bake them and then freeze and warm right before I serve?
Freeze before you bake if you want or bake one batch, plate, bake second batch etc and then serve cold. They are equally amazing (if not better) served at room temperature!
2 red onions? The image shows 1
I was quite nervous about these – never worked with philo before. The triangles turned out great! Tasty and quite pretty! The store-bought pastry made 22 pieces. I only used 2/3 of the filling. In future, I’ll only add the one egg and cut back on the other filling ingredients. I baked at 350F for 26 min. Thanks for the wonderful recipe!
Can I make the filling 2 days ahead and keep it in the fridge, then make it all at once on Sunday? Today is friday
Yes you can! Although I’d add skip adding the egg in the mixture until the day it is to be baked.
I need an answer asap please